In this tutorial, we will explain everything about the most known Redis error in WordPress, known as Error establishing a Redis connection error, and the possible solutions to fix it. This issue may be caused by improperly installed and configured Redis service, misconfiguration in the wp-config.php file, network issues, plugin conflicts in WordPress, etc. In the next paragraphs, we will first explain Redis and how to fix the problems so your website is accessible again. We will use Ubuntu 24.04 OS and assume you already have a working WordPress installation. Let’s get started!
Table of Contents
What is Redis?
Redis is an open-source in-memory storage cache used as an application cache that stores the data in the RAM instead of on the disk, making the website’s performance reliable and faster. Redis can be installed locally on the same host as the application and remotely independent of the website. The difference is that locally installed Redis can take the whole CPU or RAM and slow down the machine, making the website inaccessible due to insufficient RAM or CPU. On the other hand, the remotely installed Redis can cause latency and a chance of disconnections between the application server and the Redis server. However, using Redis both ways is recommended, and using Redis is a powerful caching solution for your website.
In the next few paragraphs, we will explain the issues that can cause the error establishing a Redis connection and possible fixes.
1. The Redis service
When your browser throws an error establishing a Redis connection error, first of all, you need to check if the Redis service is running on your server. Log in to your server via SSH and execute the following command:
sudo systemctl status redis
There are two scenarios in this case. When the service is stopped OR the service is not found. The first scenario should look like this:
root@host:~# sudo systemctl status redis
○ redis-server.service - Advanced key-value store
     Loaded: loaded (/usr/lib/systemd/system/redis-server.service; enabled; preset: enabled)
     Active: inactive (dead) since Tue 2025-01-07 13:43:35 CST; 2h ago
   Duration: 23min 55.576s
       Docs: http://redis.io/documentation,
             man:redis-server(1)
    Process: 299638 ExecStart=/usr/bin/redis-server /etc/redis/redis.conf --supervised systemd --daemonize no (code=exited, status=0/SUCCESS)
   Main PID: 299638 (code=exited, status=0/SUCCESS)
     Status: "Saving the final RDB snapshot"
        CPU: 2.807s
Jan 07 16:58:35 host.test.vps systemd[1]: Stopped redis-server.service - Advanced key-value store.
Jan 07 16:58:35 host.test.vps systemd[1]: redis-server.service: Consumed 2.807s CPU time, 3.8M memory peak, 0B memory swap peak.
In this case, we only need to start the Redis service with the command below:
sudo systemctl start redis
To check the status of the service, execute the command below:
sudo systemctl status redis
You should get output like this:
root@host:~# sudo systemctl status redis
● redis-server.service - Advanced key-value store
     Loaded: loaded (/usr/lib/systemd/system/redis-server.service; enabled; preset: enabled)
     Active: active (running) since Tue 2025-01-07 13:51:38 CST; 3s ago
       Docs: http://redis.io/documentation,
             man:redis-server(1)
   Main PID: 306399 (redis-server)
     Status: "Ready to accept connections"
      Tasks: 5 (limit: 4613)
     Memory: 3.3M (peak: 3.8M)
        CPU: 98ms
     CGroup: /system.slice/redis-server.service
             └─306399 "/usr/bin/redis-server 127.0.0.1:6379"

Jan 07 13:51:38 host.test.vps systemd[1]: Starting redis-server.service - Advanced key-value store...
Jan 07 13:51:38 host.test.vps systemd[1]: Started redis-server.service - Advanced key-value store.
The output of the second Scenario will look like this:
root@host:~# sudo systemctl status redis
Unit redis.service could not be found.
This means that the Redis service does not exist and was somehow accidentally deleted. To install it again, execute the following command:
sudo apt install redis -y
Once installed, you can start the service with the same command we provided you above:
sudo systemctl start redis
To check if the Redis is running, you can use the command below:
netstat -tunlp | grep 6379
You should get the following output:
root@host:~# netstat -tunlp | grep 6379
tcp        0      0 127.0.0.1:6379          0.0.0.0:*               LISTEN      307089/redis-server
tcp6       0      0 ::1:6379                :::*                    LISTEN      307089/redis-server
By default, Redis is running on port 6379, and the output shows that this service is listening on that port.
2. Check the Firewall
If the Redis server is not accessible from the application server, we need to open port 6379 in the firewall on the server where Redis is installed. To open the port in Iptables, you can use the following commands:
iptables -A INPUT -p tcp --dport 6379 -j ACCEPT

iptables -A OUTPUT -p tcp --dport 6379 -j ACCEPT
To open the port using UFW, you can use the following command:
sudo ufw allow 6379

sudo ufw reload
3. Redis-Cli
Another way to check if the Redis is running correctly is to use the redis-cli command. To do that, execute the command below:
redis-cli ping
If everything is OK, you should receive the output below:
root@host:~# redis-cli ping
PONG
4. Check wp-config.php Configuration
We assume that Redis was running fine previously, and somehow, the error establishing a Redis connection appeared in the browser. Open the wp-config.php file with your favorite editor and pay attention to these lines of code:
define('WP_REDIS_HOST', '127.0.0.1');
define('WP_REDIS_PORT', 6379);
define('WP_REDIS_PASSWORD', 'StrongPasswordForRedisHere');
define( 'WP_REDIS_TIMEOUT', 2 );
define( 'WP_REDIS_READ_TIMEOUT', 2 );
These lines of code define the Redis host, port, password, and timeout. If the other settings are fine, you may try increasing the timeout. Another hint would be to check if Redis is on a remote machine. If the Redis Host is listening on a public IP address, you should connect to that remote server and return to the first two steps to check the Redis service.
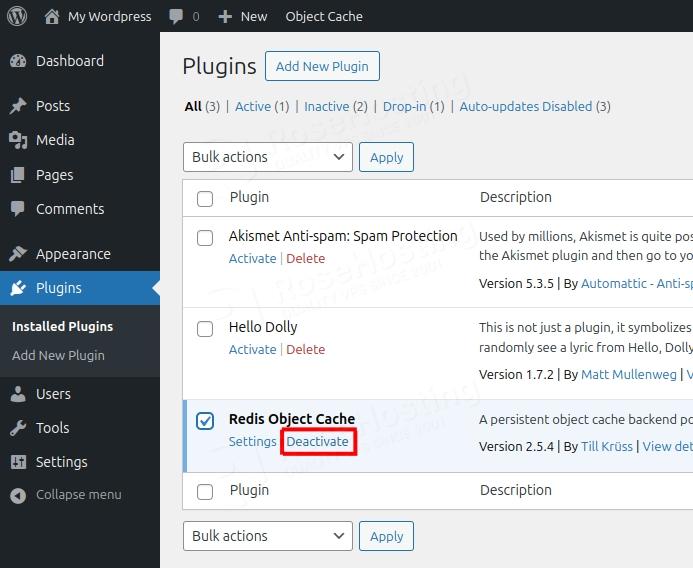
5. Reinstall the Redis Object Cache Plugin
Log in to your WordPress admin dashboard. On the left menu, navigate to Plugins -> Installed Plugins. Find the Redis Object Cache, click the checkbox to select the plugin, and click the deactivate button.
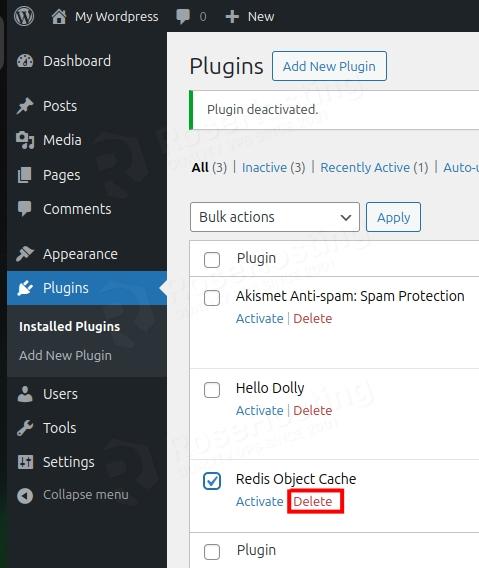
Once the plugin is deactivated, we can safely delete it by clicking the delete button.
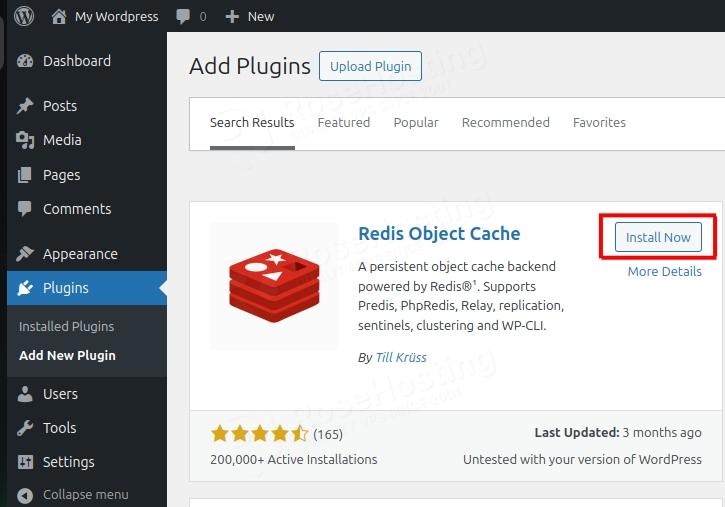
Now, we can install it from scratch. Go again to the Plugins -> Add New Plugin section, and in the search area, type Redis Object Cache. The plugin will appear on the left, and you can click on the Install Now button as explained in the picture below:
6. Disable the Redis Object Cache Plugin
Suppose you cannot perform the previous step and access the WordPress admin dashboard. In that case, you can disable the Redis Object Cache plugin via the terminal directly in the WordPress plugin directory. To do that, navigate to your website’s Document Root.
cd /var/www/html/wordpress/wp-content/plugins/
Once navigated, list the content of the directory:
ls -al
You should receive output similar to this or with a list with more plugins:
drwxr-xr-x 4 www-data www-data 4096 Nov 21 08:07 akismet
-rw-r--r-- 1 www-data www-data 2578 Mar 18  2019 hello.php
-rw-r--r-- 1 www-data www-data   28 Jun  5  2014 index.php
drwxr-xr-x 6 www-data www-data 4096 Jan  7 15:30 redis-cache
To disable the Redis Object Cache plugin, execute the following command:
mv redis-cache/ redis-cache.disabled/
Once this is done, navigate to the wp-content directory (one directory back):
cd /var/www/html/wordpress/wp-content/
Remove the object-cache.php file:
rm object-cache.php
Once this is done, you can reaccess your website.
7. Check the Redis log
The last thing to check is the Redis server log file. To check the Redis log file, you can execute the command below:
tail -f /var/log/redis/redis-server.log
With this command, you can view the log in real-time on your server and all incoming outputs when the browser throws the error establishing a Redis connection error.
That’s it! You have learned some basic steps on how to fix the error establishing a Redis connection error.
Of course, you don’t have to debug the issue yourself. If you have difficulties with Redis, contact our technical support. You only need to sign up for one of our Redis hosting plans and submit a support ticket. We are available 24/7 and will take care of your request immediately.
If you liked this post about error establishing a Redis connection in WordPress, please share it with your friends or leave a comment below.