gpEasy is a simple and powerful CMS. It was designed to be an easy to use, but lightweight and fully functional content management system (CMS).
gpEasy CMS doesn’t require you to setup any databases and allows you to edit your website on the fly since it’s flat-file based.
Nginx is a lightweight but very powerful web server. It’s known to be ultimately stable and high-performance HTTP server.
PHP5-FPM stands for PHP5 FastCGI Process Manager and it is an alternative PHP FastCGI implementation with some additional features useful for sites of any size, especially busier sites.
We’ll assume that unzip is installed on your Linux VPS. If not, run the following command to install the program:
# apt-get install unzip
REQUIREMENTS
We are using our SSD 1 VPS hosting plan for this tutorial.
UPDATE THE SYSTEM
Login to your server as root and execute the following commands:
# apt-get update
# apt-get upgrade
INSTALL NGINX AND PHP5-FPM
Now we need to install Nginx and PHP5-FPM:
# apt-get install nginx php5-fpm
For the purpose of this tutorial let’s create a new user who will hold the gpEasy installation in his home directory.
# adduser gpeasy
Finish the steps of user creation and then add the gpeasy user to www-data group to avoid permission errors using the bellow command:
# usermod -a -G www-data gpeasy
Since this command won’t output anything, for your peace of mind you can still perform a check using:
# groups gpeasy | grep www-data
The following step of this installation procedure is to login as the gpeasy user that we created. To do that, execute and enter the password you set up:
# login gpeasy
Once you are logged in, you will notice that you are currently located in the gpeasy user home directory.
INSTALL gpEasy
First, let’s download gpEasy CMS:
# wget -c http://gpeasy.com/Special_gpEasy?cmd=dlzip -O gpeasy.zip
Unzip the downloaded zip file:
# unzip gpeasy.zip
Rename the gpEasy directory to gpEasyCMS to avoid confusion when setting up the Nginx configuration for this content managment system.
# mv gpEasy/ gpEasyCMS/
Next, we need to give the right permissions and change the group on the data directory of gpEasy. This is needed to avoid read/write errors when using gpEasy.
# chmod 775 /home/gpeasy/gpEasyCMS/data
# chgrp www-data /home/gpeasy/gpEasyCMS/data
It is recommended to disable executing of the following files for everyone including owner and the group:
# chmod 664 gpEasyCMS/data/example_htaccess
# chmod 664 gpEasyCMS/data/index.html
Log out from gpeasy user:
# logout
CONFIGURE NGINX
First, remove the default nginx site configuration:
# rm /etc/nginx/sites-enabled/default
If you want to point more domains to the server, it might be needed to increase hash bucket size in the Nginx configuration file. To do that, open the file with your favorite text editor. We are using vim for our purposes:
# vim /etc/nginx/nginx.conf
Find the ‘# server_names_hash_bucket_size 64;’ line in this file and remove # from the line. Save it and close the file.
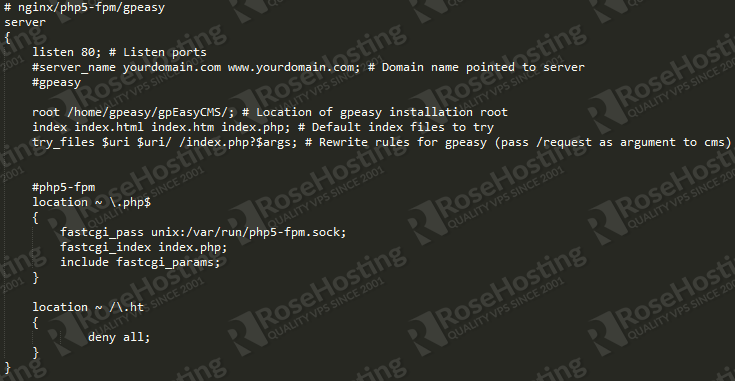
Create the site configuration for your gpEasy installation:
# vim /etc/nginx/sites-available/gpeasy
Now, paste the following configuration and replace the ‘yourdomain’ value with your actual existing domain:
If you want to enable image functions for gpEasy run the following command:
# apt-get install php5-gd
Enable the gpEasy website configuration:
# ln -s /etc/nginx/sites-available/gpeasy /etc/nginx/sites-enabled/gpeasy
Restart Nginx and PHP5-FPM:
# /etc/init.d/php5-fpm restart
# /etc/init.d/nginx restart
Now you can finish your gpEasy installation by opening your favorite web browser and navigate to: http://your_ip_address/gpEasyCMS
Of course you don’t have to do any of this if you use one of our Linux VPS Hosting services, in which case you can simply ask our expert Linux admins to install gpEasy CMS for you.They are available 24×7 and will take care of your request immediately.
PS. If you liked this post please share it with your friends on the social networks using the buttons on the left or simply leave a reply below. Thanks.
