We’ll explain, How to install Confluence on CentOS 7. Confluence is a wiki team collaboration software which is written in Java. It is a centralized place where you and your team members can work together on projects. With Confluence you can add custom features via plugins, integrate Microsoft Office and SharePoint, easily edit and publish project related tasks and more. Installing Confluence on CentOS 7, is an easy task and should take less than 15 minutes.
REQUIREMENTS
We will be using our CentOS 7 Linux VPS template for this tutorial. Before proceeding you should check the system requirements for Confluence.
The server on which you will install Confluence will need a working LAMP (Linux, Apache, MySQL & PHP) stack installed. So if you need to install LAMP you can do that by following our excellent tutorials. However, do not install MariaDB as shown in the tutorial since Confluence supports MySQL instead of MariaDB . We will cover the MySQL installation later in this article.
Table of Contents
1. Update the system
As always, make sure your server is fully up-to-date with the command below:
# yum update
Also, install a text editor of your choice. We will use nano as our text editor:
# yum install nano
2. Install and configure Java
Confluence requires JAVA in order to run. We are going to install Oracle’s JAVA JDK 8. Use the command below to download JDK 8:
# wget --no-cookies --no-check-certificate --header "Cookie: oraclelicense=accept-securebackup-cookie" "http://download.oracle.com/otn-pub/java/jdk/8u151-b12/e758a0de34e24606bca991d704f6dcbf/jdk-8u151-linux-x64.rpm" -O /opt/jdk-8u151-linux-x64.rpm
Install JAVA:
# yum install /opt/jdk-8-linux-x64.rpm
Configure the JAVA package using the alternatives command:
# JDK_DIRS=($(ls -d /usr/java/jdk*))

# JDK_VER=${JDK_DIRS[@]:(-1)}

# alternatives --install /usr/bin/java java /usr/java/"${JDK_VER##*/}"/jre/bin/java 20000

# alternatives --install /usr/bin/jar jar /usr/java/"${JDK_VER##*/}"/bin/jar 20000

# alternatives --install /usr/bin/javac javac /usr/java/"${JDK_VER##*/}"/bin/javac 20000

# alternatives --install /usr/bin/javaws javaws /usr/java/"${JDK_VER##*/}"/jre/bin/javaws 20000

# alternatives --set java /usr/java/"${JDK_VER##*/}"/jre/bin/java

# alternatives --set javaws /usr/java/"${JDK_VER##*/}"/jre/bin/javaws

# alternatives --set javac /usr/java/"${JDK_VER##*/}"/bin/javac
You can check if JAVA has been properly setup on your server using:
# java -version
3. Install MySQL server
You need to install MySQL from the community repository.
Download and install the repo:
# wget http://repo.mysql.com/mysql-community-release-el7-5.noarch.rpm

# sudo rpm -ivh mysql-community-release-el7-5.noarch.rpm
Update the package index:
# yum update
Now install and start MySQL:
# yum install mysql-server mysql-client

# systemctl start mysqld
Enable MySQL to start on boot:
# systemctl enable mysqld
With the MySQL installation out of our way, we can now create a database for the Confluence installation. But first, run the mysql_secure_installation script to harden your MySQL server:
# mysql_secure_installation
Configure it like this:
- Set root password? [Y/n] y
- Remove anonymous users? [Y/n] y
- Disallow root login remotely? [Y/n] y
- Remove test database and access to it? [Y/n] y
- Reload privilege tables now? [Y/n] y
Now, log into MySQL as root and create the database:
# mysql -u root -p

mysql> CREATE DATABASE confluence CHARACTER SET utf8 COLLATE utf8_bin;
Query OK, 1 row affected (0.00 sec)

mysql> GRANT ALL PRIVILEGES ON confluence.* TO 'confluenceuser'@'localhost' IDENTIFIED BY 'your_password';
Query OK, 0 rows affected (0.00 sec)

mysql> flush privileges;
Query OK, 0 rows affected (0.00 sec)

mysql> exit
4. Install Confluence on CentOS 7
You need to download the appropriate Confluence ‘Linux 64-bit/ 32-bit installer’ from their download page.
We are using a 64-bit CentOS 7 VPS, so we will use the 64-bit installer.
You can use the arch command to check whether you are running a 64 or 32 bit OS on your server. For example our CentOS 7 OS is 64-bit:
[root@linuxvps /]# arch
x86_64
Ok, now let’s get down to business. We are downloading the 64-bit installer:
# wget https://www.atlassian.com/software/confluence/downloads/binary/atlassian-confluence-6.4.2-x64.bin
Make the bin file executable:
# chmod a+x atlassian-confluence-6.4.2-x64.bin
Run the installer with ‘root‘ user privileges and the installation will create a dedicated Linux user account named ‘confluence‘ which will be used to run Confluence:
# ./atlassian-confluence-6.4.2-x64.bin
You will get the following output:
Unpacking JRE ...
Starting Installer ...
Dec 03, 2015 10:43:54 AM java.util.prefs.FileSystemPreferences$1 run
INFO: Created user preferences directory.

This will install Confluence 6.4.2 on your computer.
OK [o, Enter], Cancel [c]
Press enter.
Choose the appropriate installation or upgrade option.
Please choose one of the following:
Express Install (uses default settings) [1],
Custom Install (recommended for advanced users) [2, Enter],
Upgrade an existing Confluence installation [3]
You can proceed with a custom install if you want, but we will enter 1 in our CLI for an Express install with the default settings:
See where Confluence will be installed and the settings that will be used.
Installation Directory: /opt/atlassian/confluence
Home Directory: /var/atlassian/application-data/confluence
HTTP Port: 8090
RMI Port: 8000
Install as service: Yes
Install [i, Enter], Exit [e]
Press Enter again to start the Confluence installation which will give you the below output:
Extracting files ...

Please wait a few moments while Confluence starts up.
Launching Confluence ...
Installation of Confluence 6.4.2 is complete
Your installation of Confluence 6.4.2 is now ready and can be accessed via
your browser.
Confluence 6.4.2 can be accessed at http://localhost:8090
Finishing installation ...
5. Configure Confluence
As you can see, Confluence is listening on port 8090. You can change this and the URI path in the server.xml file. And indeed, we need to change the URL from which we will access Confluence. Therefore, enter the conf directory:
# cd /opt/atlassian/confluence/conf
However, you need to shutdown Confluence first and then edit the server.xml file.
# sh /opt/atlassian/confluence/bin/shutdown.sh

# nano server.xml
Now, find the ‘localhost’ value and replace it with your server IP address.
Save and exit the file. Next step is to configure a MySQL datasource connection for Confluence. In order to do that, you need to install the MySQL JDBC driver. Below is the procedure to do that. Execute the below commands:
# cd /opt
# wget http://dev.mysql.com/get/Downloads/Connector-J/mysql-connector-java-5.1.35.tar.gz
# tar -zxvf mysql-connector-java-5.1.35.tar.gz
# cd /opt/mysql-connector-java-5.1.35
# mv mysql-connector-java-5.1.35-bin.jar /opt/atlassian/confluence/confluence/WEB-INF/lib/
With these commands you are downloading the JDBC driver in the /opt directory, extracting it and then move the unpacked jar file in the appropriate Confluence directory (/opt/atlassian/confluence/confluence/WEB-INF/lib/).
Next, edit the server.xml file again:
# nano /opt/atlassian/confluence/conf/server.xml
Find the following lines:
<Context path="" docBase="../confluence" debug="0" reloadable="true">
   <!-- Logger is deprecated in Tomcat 5.5. Logging configuration for Confluence is specified in confluence/WEB-INF/classes/log4j.properties -->
Insert the underneath lines within the Context element (between the ‘<Context path=”” docBase=”” ‘ and ‘<!– Logger is deprecated in Tomcat 5.5.” ‘ line):
<Resource name="jdbc/confluence" auth="Container" type="javax.sql.DataSource" username="confluenceuser" password="your_password" driverClassName="com.mysql.jdbc.Driver" url="jdbc:mysql://localhost:3306/confluence?useUnicode=true&characterEncoding=utf8" maxActive="15" maxIdle="7" defaultTransactionIsolation="READ_COMMITTED" validationQuery="Select 1" />
Of course replace your_password with the password you configured during the creation of the confluence database. Save and close the file. Now edit the web.xml file located in the WEB-INF directory:
# nano /opt/atlassian/confluence/confluence/WEB-INF/web.xml
Insert the following components just before </web-app> near the end of the file:
<resource-ref>
    <description>Connection Pool</description>
    <res-ref-name>jdbc/confluence</res-ref-name>
    <res-type>javax.sql.DataSource</res-type>
   <res-auth>Container</res-auth>
</resource-ref>
Save and close the web.xml file.
6. Start Confluence
After all these changes you’ve made to the configuration files, you can now start Confluence. Issue this command:
# sh /opt/atlassian/confluence/bin/start-confluence.sh
For troubleshooting use the Confluence log file (/opt/atlassian/confluence/logs/catalina.out).
7. Finish the installation in web browser
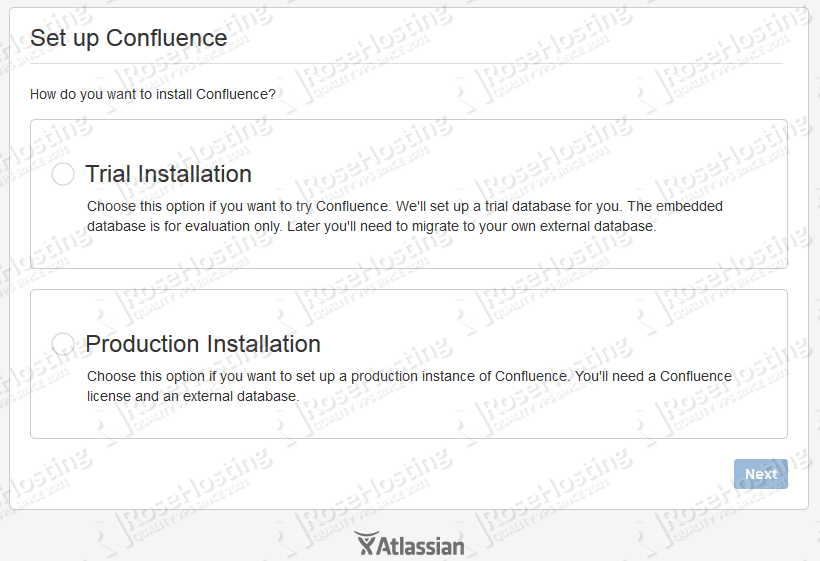
You can now finish the Confluence installation at: http://your_server_IP:8090 . You will be welcomed by the installation page as shown in the picture below:
Click on Production Installation (you can choose a Trial Installation of course, since the Product install requires you to have an active Confluence license), choose if you want to have an addon and enter your license key in the following screen.
Then, set up the database. Choose MySQL and Direct JDBC Connection. Enter the corresponding settings:
Driver Class Name: com.mysql.jdbc.Driver

Database URL: jdbc:mysql://localhost:3306/confluence?useUnicode=true&characterEncoding=utf8

Username: confluenceuser

Password: your_password
Then click on Next and finish the Confluence configuration.
Congratulations, if you followed our steps carefully you now have a fully working Confluence installation on your CentOS 7 VPS. For more information about Confluence, visit their official documentation.
Of course you don’t have to install Confluence on CentOS 7, if you use one of our hosting services in which case you can simply ask our expert Linux admins to install Confluence on CentOS 7, for you. They are available 24×7 and will take care of your request immediately.
PS. If you liked this post, on how to install Confluence on CentOS 7, please share it with your friends on the social networks using the buttons on the left or simply leave a reply below. Thanks.


As a person who writes many of these guides for various subjects, just wanted to say thanks for this
to the point – short & well work for me in RHEL 6.8 ( version diff) Thanks you.
Thank you for the guide! It’s a really good one!
I have question:
Can you update this guide? Until the step “finishing installation of confluence” with a acutal confluence version it runs well over . Only the MySQL Connection does not work. If I will further configure confluence for the mysql database connection, after the configuration in centos (installed the old mysql connector 5.1.35 from this article), confluence crashed on (Website not available). I’m not sure if I configured at some points wrong, or the versions are crashing :-/
Greetz from germany
The guide has been updated. It now includes the latest Java and Confluence version, it has been tested and if you follow the instructions carefully it works without any issues.
I am unable to upgrade confluence 6.0.6 to latest can somebody help me