NextCloud is one of the most popular free and open-source self-hosted file sync and sharing application. You can use it to store your personal files, contacts, pictures, music, and much more and it allows you to access them or share them with your friends at any time. It is a popular alternative to another widely used file hosting application called ownCloud.
In this tutorial, we will show you how to install NextCloud 13 on an Ubuntu 16.04 VPS.
If you are an ownCloud user looking to migrate to NextCloud, make sure you also read our tutorial on how to migrate from ownCloud to NextCloud.
We have an updated version of this tutorial on How to Install Nextcloud on Ubuntu 20.04
Requirements
Before we start with the installation a few requirements must be meet:
– SSH access to your server. You will need to be able to connect to your server via SSH.
– LAMP stack consisting of Linux, Apache web server, MySQL or MariaDB database server, and PHP 7.0, 7.1 or 7.2.
It is also recommended to secure your NextCloud with an SSL certificate.
Table of Contents
1. Login via SSH and update your system
First, you need to login to your server via SSH as user root:
ssh root@IP_ADDRESS -p PORT_NUMBER
make sure that you replace “IP_ADDRESS” and “PORT_NUMBER” with your actual server IP address and SSH port number.
After you log in, let’s make sure that your Ubuntu 16.04 server is up-to-date by running the following commands:
apt-get update
apt-get upgrade
2. Install Apache
Run the following command to install Apache on your server:
apt-get install apache2
After the installation is completed, you can enable the service to be started automatically upon system boot with:
systemctl enable apache2
You can verify if the Apache server is running, with the following command:
systemctl status apache2
3. Install PHP 7.0
To install PHP 7 along with all the additional modules required by NextCloud, run the following command:
apt-get install php7.0 libapache2-mod-php7.0 php7.0-common php7.0-gd php7.0-json php7.0-mysql php7.0-curl php7.0-mbstring php7.0-intl php7.0-mcrypt php-imagick php7.0-xml php7.0-zip
4. Install MySQL Database server and create a database
Next, we need to install the MySQL database server. To do this, simply run the following command:
apt-get install mysql-server
You can now start the database server and enable it to automatically start upon boot, with the following commands::
systemctl start mysql
systemctl enable mysql
You can also run the mysql_secure_installation script to harden the security of your MySQL database server:
mysql_secure_installation
After you have answered all the questions you can now go ahead and login to MySQL as root using your root password, with the following command:
mysql -u root -p
To create a new database for your NextCloud installation, run the following commands:
CREATE DATABASE nextcloud_db;
GRANT ALL PRIVILEGES ON nextcloud_db.* TO 'nextcloud_user'@'localhost' IDENTIFIED BY 'PASSWORD';
FLUSH PRIVILEGES;
exit;
Make sure to replace “PASSWORD” with an actual, strong password.
5. NextClould Installation
Our hosting environment is ready and we also created a new database. We can now proceed with the actual NextClould installation.
Run the following commands to download and extract the latest NextCloud 13 installation files:
cd /var/www
wget https://download.nextcloud.com/server/releases/latest-13.zip
unzip latest-13.zip
chown -R www-data:www-data nextcloud
rm latest-13.zip
6. Set up Apache Virtual Host
In order to access your NextCloud installation with your domain, you will need to create an Apache virtual host configuration file. You can create this with the nano text editor:
nano /etc/apache2/sites-available/nextcloud.conf
Now enter the following information into the file:
<VirtualHost *:80>
ServerAdmin admin@yourdomain.com
DocumentRoot /var/www/nextcloud
ServerName yourdomain.com
ServerAlias www.yourdomain.com

Alias /nextcloud "/var/www/nextcloud/"
<Directory /var/www/nextcloud/>
 Options +FollowSymlinks
 AllowOverride All

<IfModule mod_dav.c>
 Dav off
 </IfModule>

SetEnv HOME /var/www/nextcloud
 SetEnv HTTP_HOME /var/www/nextcloud
</Directory>

ErrorLog /var/log/apache2/nextcloud-error_log
CustomLog /var/log/apache2/nextcloud-access_log common
</VirtualHost>
Then we need to enable the virtual host file with the following command:
ln -s /etc/apache2/sites-available/nextcloud.conf /etc/apache2/sites-enabled/nextcloud.conf
Also, we need to make sure that the following apache mods are also enabled:
a2enmod rewrite headers env dir mime
Finally, restart the Apache web server:
systemctl restart apache2
7. Complete the NextClould Installation via Web Browser
You can now go to your http://yourdomain.com (or http://YOUR_IP_ADDRESS) and follow the on-screen instructions to complete the NextCloud installation.
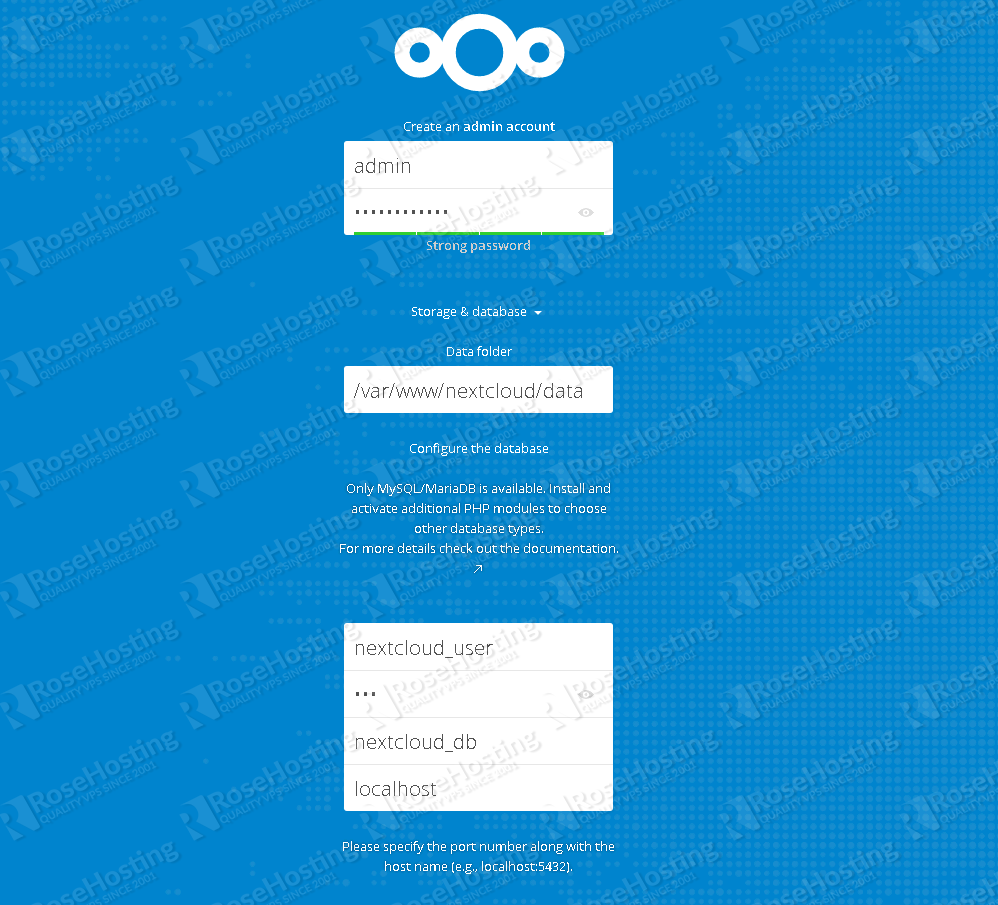
You will need to create your admin user account by choosing your own username and password. Under the “Storage & Database” section, enter the information of the database we have previously created and then click on “Finish Setup”.
That’s it. Your NextCloud has been successfully installed and you can log in with the login credentials of your admin user.
Of course, you don’t have to Install NextCloud 13 on Ubuntu 16.04, if you use one of our NextClould Hosting services, in which case you can simply ask our expert Linux admins to setup this for you. They are available 24×7 and will take care of your request immediately.
PS. If you liked this post, on How To Install NextCloud 13 on Ubuntu 16.04, please share it with your friends on the social networks using the buttons on the left or simply leave a reply below. Thanks.
You forget to disable the default config of the apache.
Regards