In this tutorial we will explain how to install Nextcloud on Debian 12 OS. Nextcloud is an open-source client-server software with similar functionality as Dropbox, Google Drive and Office 365. It is written in PHP, using MySQL or PostgreSQL to store the data. Nextcloud is available in over fifty languages and provides features such as online storage, data synchronization, collaboration, video conferencing, and many more. In this blog post, we will install Nextcloud with the LAMP stack.
Installing Nextcloud with the LAMP stack is a straightforward process that may take up to 20 minutes. Let’s get started!
Table of Contents
Prerequisites
- A server running Debian 12 OS
- User privileges: root or non-root user with sudo privileges
Step 1. Update the System
We assume you have a fresh installation of Debian 12. It is recommended that the packages to be updated to their latest version available before we take any actions on the server.
sudo apt update -y && sudo apt upgrade -y
Step 2. Install Apache Web server
The first of the LAMP stack will be the Apache web server. To install it execute the following command:
sudo apt install apache2 -y
Once installed start and enable the Apache service:
sudo systemctl start apache2 && sudo systemctl enable apache2
To check the status of the service execute the following command:
sudo systemctl status apache2
You should receive the following output:
root@host:~# sudo systemctl status apache2
● apache2.service - The Apache HTTP Server
     Loaded: loaded (/lib/systemd/system/apache2.service; enabled; preset: enabled)
     Active: active (running) since Tue 2024-06-18 18:10:43 CDT; 20h ago
       Docs: https://httpd.apache.org/docs/2.4/
   Main PID: 723 (apache2)
      Tasks: 10 (limit: 4644)
     Memory: 29.3M
        CPU: 5.089s
     CGroup: /system.slice/apache2.service
Jun 18 18:10:43 host.test.vps systemd[1]: Started apache2.service - The Apache HTTP Server.
Step 3. Install PHP with extensions
Next is to install PHP8.2 with its extensions. Execute the following command:
sudo apt install php php-curl php-cli php-mysql php-gd php-gmp libmagickcore-dev php-redis php-memcached php-common php-xml php-json php-intl php-pear php-dev php-common php-mbstring php-zip php-soap php-bz2 php-bcmath php-imagick -y
Once the installation of PHP is complete, check the version with the command below:
php -v
You should get the following output:
root@host:~# php -v
PHP 8.2.18 (cli) (built: Apr 11 2024 22:07:45) (NTS)
Copyright (c) The PHP Group
Zend Engine v4.2.18, Copyright (c) Zend Technologies
    with Zend OPcache v8.2.18, Copyright (c), by Zend Technologies
Step 4. Install MariDB database service
Last of the LAMP stack will be the database service. We will install the MariaDB database service with the following command:
sudo apt install mariadb-server -y
Once installed start and enable the service:
sudo systemctl start mariadb && sudo systemctl enable mariadb
To check the status of the service, execute the following command:
sudo systemctl status mariadb
You will get output similar to this:
root@host:~# sudo systemctl status mariadb
● mariadb.service - MariaDB 10.11.6 database server
     Loaded: loaded (/lib/systemd/system/mariadb.service; enabled; preset: enabled)
     Active: active (running) since Wed 2024-06-18 15:16:49 CDT; 2min 25s ago
       Docs: man:mariadbd(8)
             https://mariadb.com/kb/en/library/systemd/
   Main PID: 14008 (mariadbd)
     Status: "Taking your SQL requests now..."
      Tasks: 9 (limit: 4644)
     Memory: 211.7M
        CPU: 960ms
     CGroup: /system.slice/mariadb.service
             └─14008 /usr/sbin/mariadbd
Jun 18 15:16:49 host.test.vps systemd[1]: Started mariadb.service - MariaDB 10.11.6 database server.
Jun 18 15:16:49 host.test.vps /etc/mysql/debian-start[14034]: Checking for insecure root accounts.
Jun 18 15:16:49 host.test.vps /etc/mysql/debian-start[14038]: Triggering myisam-recover for all MyISAM tables and aria-recover for all Aria tables
Step 5. Create MySQL database and user
The LAMP stack is installed, and the next step is to create a MySQL database, MySQL user, and permissions for that user on the database.
To do that log in to the MySQL console and execute the following commands:
CREATE DATABASE nextcloud;
CREATE USER nextclouduser@localhost IDENTIFIED BY 'YourStrongPasswordHere';
GRANT ALL PRIVILEGES ON nextcloud.* TO nextclouduser@localhost;
FLUSH PRIVILEGES;
EXIT;
Step 6. Download and Install Nextcloud
First we need to download the Nextcloud into the Apache document root:
cd /var/www/html

curl -o nextcloud.zip https://download.nextcloud.com/server/releases/latest.zip
Next we need to unzip and set the right permissions:
unzip nextcloud.zip

chown -R www-data:www-data nextcloud/
Step 7. Create Apache Virtual Host File
Create an Apache configuration file with the following command:
touch /etc/apache2/sites-available/nextcloud.conf
Open the file with your favorite editor and paste the following lines of code:
<VirtualHost *:80>
    ServerName YourDomainNameHere
    DocumentRoot /var/www/nextcloud/

    <Directory /var/www/nextcloud/>
        Options +FollowSymlinks
        AllowOverride All
    </Directory>
</VirtualHost>
Save the file, close it, and enable the website with the rewrite module:
sudo a2enmod rewrite

sudo a2ensite nextcloud
Check if the Apache syntax is OK:
root@host:/var/www/html# apachectl -t
Syntax OK
Then restart the Apache service:
sudo systemctl restart apache2
Now you can access the installation at http://YourDomainHere to finish the installation
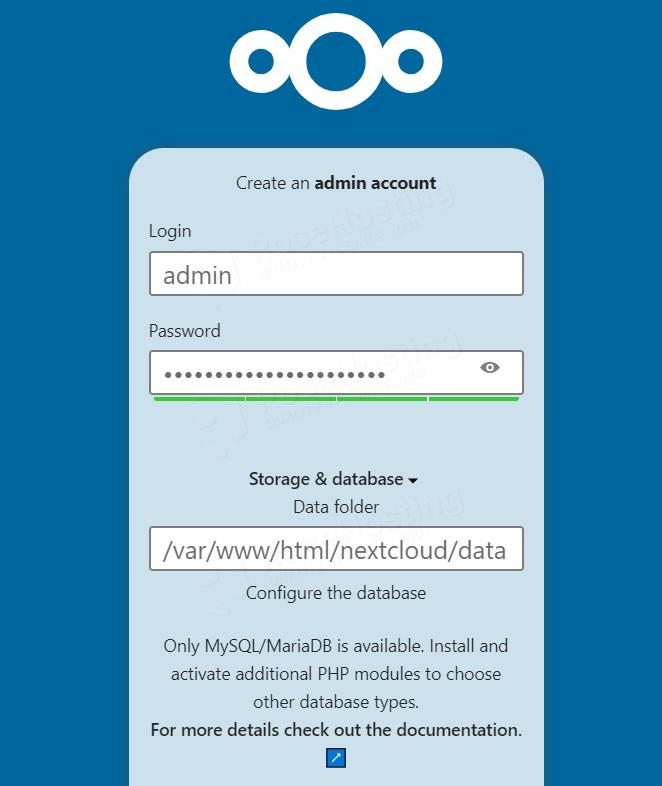
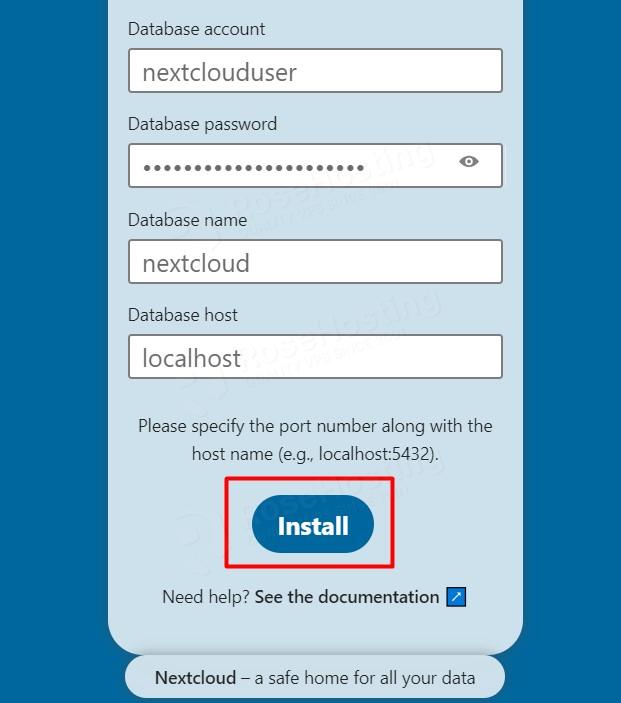
Step 8. Finish Nextcloud installation
Once you access the domain on the first screen, you must enter your admin login username, and password and fill in the database credentials you created in Step 5. Once you fill them click on the Install button.
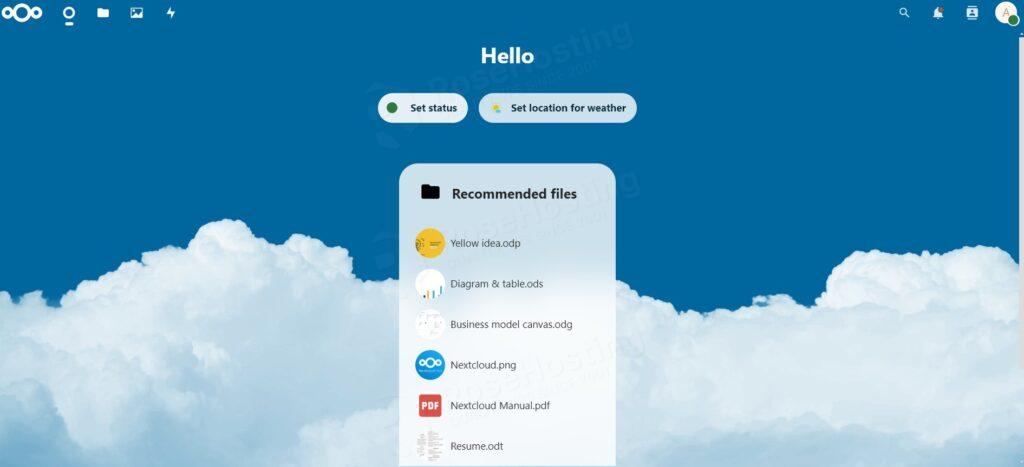
The installation will be completed in the background and redirect you to the admin dashboard.
That’s it. You successfully learned how to install Nextcloud on Debian 12. Of course, you do not have to do this on your own. You only need to sign up for one of our NVMe VPS plans and submit a support ticket. Our admins will help you with your server’s Nextcloud installation and configuration.
If you liked this post on installing Nextcloud on Debian 12, please share it with your friends or leave a comment below.