PostgreSQL is one of many powerful and famous object-relational database systems. It is a free and open-source database management system. Usually, people manage their PostgreSQL databases through a command-line interface, which might give some difficulties to novice users.

PhpPgAdmin is an open-source web administration interface for PostgreSQL written in PHP. It is used to manage PostgreSQL databases through a web interface.
In this tutorial, we will show you how to install PhpPgAdmin on an Ubuntu 20.04 VPS.
Table of Contents
Prerequisites
- Ubuntu 20.04
- SSH root access or a non-root user with sudo privileges
- Apache and PHP
Step 1. Log in via SSH and update the system
Log in to your Ubuntu 20.04 VPS
ssh root@IP_Address -p Port_number
Make sure to replace “IP_Address” and “Port_number” with your server’s actual IP address and SSH port number.
Once logged in, you can check whether you have the proper Ubuntu version installed on your server with the following command:
# lsb_release -a
You should get this output:
Distributor ID: Ubuntu
Description: Ubuntu 20.04 LTS
Release: 20.04
Codename: focal
Then, run the following command to make sure that all installed packages on the server are updated to the latest available version.
# apt update && apt upgrade -y
Step 2. Install PostgreSQL server
When writing this tutorial, the default PostgreSQL version in the repository is PostgreSQL 12. Let’s run the following command to install PostgreSQL server.
# apt install postgresql postgresql-client postgresql-client-common postgresql-common postgresql-contrib -y
Once installed, the service will automatically be started, you can check the status with this command:
# systemctl status postgresql
It will show you the status
root@ubuntu-20:~# systemctl status postgresql

● postgresql.service - PostgreSQL RDBMS
 Loaded: loaded (/lib/systemd/system/postgresql.service; enabled; vendor preset: enabled)
 Active: active (exited) since Tue 2020-05-19 04:39:03 CEST; 25 minutes ago

Main PID: 137654 (code=exited, status=0/SUCCESS)
Tasks: 0 (limit: 2286)
Memory: 0B
CGroup: /system.slice/postgresql.service
May 19 04:39:03 ubuntu-20 systemd[1]: Starting PostgreSQL RDBMS...
May 19 04:39:03 ubuntu-20 systemd[1]: Finished PostgreSQL RDBMS.
Step 3. Configure PostgreSQL
By default, the PostgreSQL server will listen on localhost. If you want to access from another network, we need to modify the configuration file to listen on all addresses or a specific address, this time we will make it listen on all addresses.
# nano /etc/postgresql/12/main/postgresql.conflisten_addresses = '*'
Edit the PostgreSQL configuration file (pg_hba.conf) and enable md5 passwords for local connections to enable password authentication.
# nano /etc/postgresql/12/main/pg_hba.confReplace the following:
local   all             postgres                                peer
local   all             all                                     peer
With this one:
local   all             postgres                                md5
local   all             all                                     md5
Restart the PostgreSQL service to apply the changes with the following command
# systemctl restart postgresql
Now, if you want to access the PostgreSQL shell using user ‘postgres’, you will be asked for the password you created earlier.
root@ubuntu-20:~# su - postgres
postgres@ubuntu-20:~$ psql
Password for user postgres:
psql (12.2 (Ubuntu 12.2-4))
Type "help" for help.
postgres=#
Step 4. Install PhpPgAdmin
In this tutorial, we will install PhpPgAdmin from the Ubuntu repository, although you can also install it from the source or the deb package.
# apt install phppgadmin php-pgsql -y
To allow login using user root or postgres, we need to modify the phpPgAdmin configuration.
# nano /etc/phppgadmin/config.inc.php
Find the following value
$conf['extraloginsecurity'] = false;
and replace with
$conf['extraloginsecurity'] = true;
We can also configure phpPgAdmin to only show databases owned by the logged-in user, modify this line.
$conf['owned_only'] = false;
and change the value to:
$conf['owned_only'] = true;
Step 5. Install Apache and PHP
If you already have Apache and PHP installed, you can skip this step.
# apt install apache2 php libapache2-mod-php -y
Now, let’s create an Apache configuration file for phpPgAdmin
# nano /etc/apache2/sites-enabled/phppgadmin.confWe are going to create an Apache configuration for phpPgAdmin, and it will be an alias.
Alias /phppgadmin /usr/share/phppgadmin
<Directory /usr/share/phppgadmin>
   <IfModule mod_dir.c>
       DirectoryIndex index.php
   </IfModule>
AllowOverride None
   <IfModule mod_php.c>
      php_flag magicquotes_gpc Off
      php_flag trackvars On
   </IfModule>
   <IfModule !mod_php.c>
     <IfModule mod_actions.c>
       <IfModule mod_cgi.c>
          AddType application/x-httpd-php .php
          Action application/x-httpd-php /cgi-bin/php
       </IfModule>
       <IfModule mod_cgid.c>
          AddType application/x-httpd-php .php
          Action application/x-httpd-php /cgi-bin/php
       </IfModule>
     </IfModule>
   </IfModule>
</Directory>
Save and quit the file, then restart Apache and open http://your-server-IP/phppgadmin in your preferred web browser.
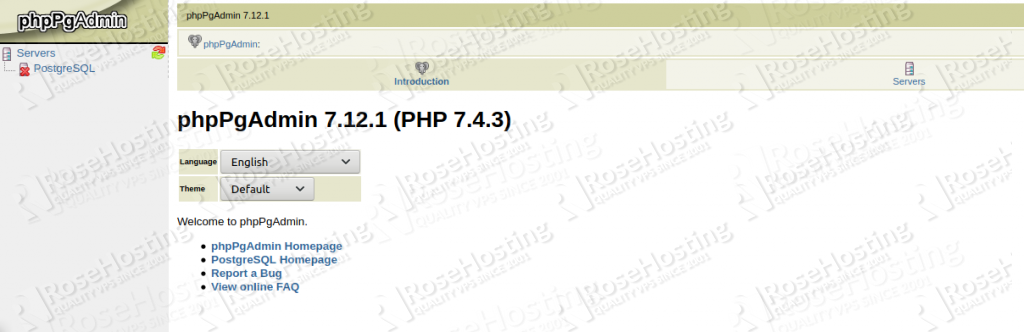
In order to log in to phpPgAdmin, we need to click on the ‘Servers’ button, then click on the ‘PostgreSQL’ link and enter postgres as username and the password of the postgres user we set previously in this tutorial.
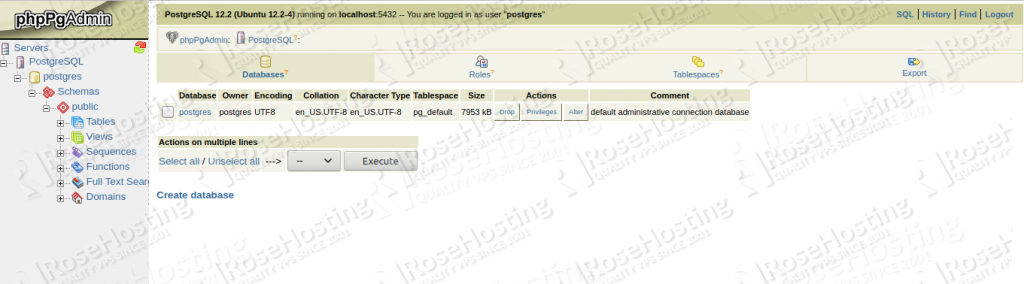
That’s it, you should be able to access your phpPgAdmin at http://your-server-IP/phppgadmin or http://yourdomain.com/phppgadmin now.

Of course, you don’t have to install phpPgAdmin on Ubuntu 20.04 if you use one of our VPS Hosting services, in which case you can simply ask our expert Linux admins to install phpPgAdmin on your Ubuntu VPS for you. They are available 24/7 and will take care of your request immediately.
PS. If you liked this post on how to install phpPgAdmin on Ubuntu 20.04, please share it with your friends on the social networks using the buttons below or simply leave a reply in the comments sections. Thanks.