Status: Deprecated
This article, “How to install ProjectSend on CentOS 6,” covers a version of CentOS 6 that reached end of life (EOL) on November 30th, 2020, and is no longer supported. For this reason, this guide is no longer maintained. If you are currently operating a server running CentOS 6, we highly recommend that you contact RoseHosting’s fully managed support to upgrade or migrate to a supported version of CentOS for you.
Today we will show you how to install ProjectSend on a Centos 6 VPS using Apache web server and MySQL database. ProjectSend is an open source file and image sharing application that allows you upload files and assign them to specific clients that you create yourself! ProjectSend is written in PHP and uses a MySQL database to store the information. This guide should work on any RPM based Linux distribution, but was tested and written for CentOS 6 VPS.
At the time of writing this tutorial, ProjectSend r582 is the latest version available and it requires:
- SSH access
- PHP (version 5.2 or later)
- Apache web server
- MySQL installed on your Linux VPS.
Installation instructions:
Login to your server via SSH:
ssh root@server_ip
Update the OS packages and install necessary packages:
sudo yum -y upgrade
sudo yum install unzip wget
Download and extract the ProjectSend archive to a directory on your server:
wget https://github.com/ignacionelson/ProjectSend/archive/master.zip
unzip master.zip
mv ProjectSend-master /var/www/html/projectsend
Create a new MySQL database for ProjectSend on your server:
mysql -u root -p
mysql> CREATE DATABASE projectsenddb;
mysql> GRANT ALL PRIVILEGES ON projectsenddb.* TO 'projectsenduser'@'localhost' IDENTIFIED BY 'your-password' WITH GRANT OPTION;
mysql> FLUSH PRIVILEGES;
mysql> quit
Rename the ‘sys.config.sample.php’ file to ‘sys.config.php’:
cd /var/www/html/projectsend/includes
mv sys.config.sample.php sys.config.php
Open the ProjectSend configuration file with your favorite text editor and change the MySQL database name, MySQL username and password with the ones you used at the time of the database creation:
nano sys.config.php
/** MySQL database name */
define('DB_NAME', 'projectsenddb');

/** Database host (in most cases it's localhost) */
define('DB_HOST', 'localhost');

/** MySQL username (must be assigned to the database) */
define('DB_USER', 'projectsenduser');

/** MySQL password */
define('DB_PASSWORD', 'your-password');
Create a new virtual host directive in Apache. For example, edit your Apache configuration file (/etc/httpd/conf/httpd.conf by default) and uncomment the following line:
#NameVirtualHost *:80
Then, add the following lines at the end:
<VirtualHost *:80>
ServerAdmin admin@yourdomain.com
DocumentRoot /var/www/html/projectsend/
ServerName yourdomain.com
ServerAlias www.yourdomain.com
<Directory /var/www/html/projectsend/>
 Options Indexes FollowSymLinks MultiViews
 AllowOverride All
 Order allow,deny
 allow from all
</Directory>
ErrorLog logs/yourdomain.com-error_log
CustomLog logs/yourdomain.com-access_log common
</VirtualHost>
Restart the Apache web service for the changes to take effect.
service httpd restart
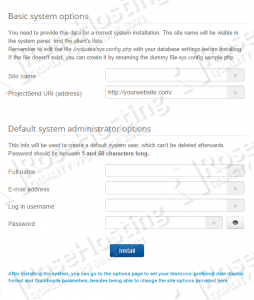
Open your favorite web browser, navigate to http://yourdomain.com/ and follow the easy instructions.You will be welcomed by the ProjectSend installation page like the one below:
Fill in the following details:
Sitename: It can be anything.(myproject.com)
ProjectSend URL: your domain name or IP address of the server.
Then, enter your personal details and login credentials: name, e-mail address, administrator username and password and click ‘Install’.
That is it. The ProjectSend installation is now complete. Now you can log in and create new users, create groups, upload files from the ProjectSend dashboard.
For more information about ProjectSend, please refer to the ProjectSend website.
Of course you don’t have to do any of this if you use one of our CentOS Hosting services, in which case you can simply ask our expert Linux admins to install ProjectSend for you.They are available 24×7 and will take care of your request immediately.
PS. If you liked this post please share it with your friends on the social networks using the buttons on the left or simply leave a reply below. Thanks.
