Moving or Migrating your existing WordPress website to a new environment or server is a very tough task for any webmaster. A minor mistake will damage your entire site. Usually, the website owner will hire a professional to migrate a site for them or find a hosting provider that offers a migration service.
RoseHosting PaaS provides a platform to deploy a lightweight WordPress installation inside a standalone container. RoseHosting PaaS provides pre-configured WordPress packages to migrate your WordPress website from any server or platform to the RoseHosting Cloud platform.
In this post, we will show you how to migrate a WordPress Website to RoseHosting Cloud PaaS
Table of Contents
Create a WordPress Environment
First, log in to the RoseHosting Cloud platform at https://app.rosehosting.cloud.
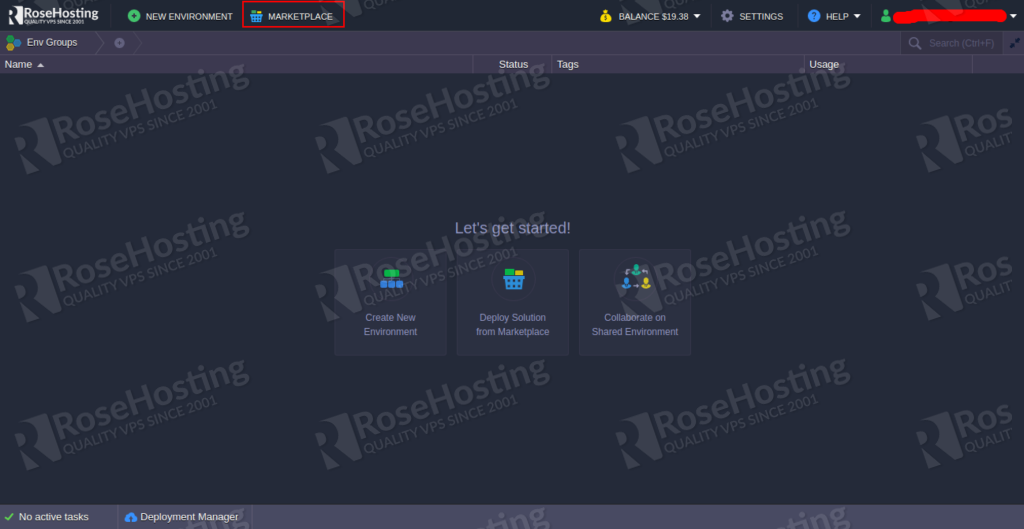
Click on the MARKETPLACE button on the top bar. You should see the following screen:
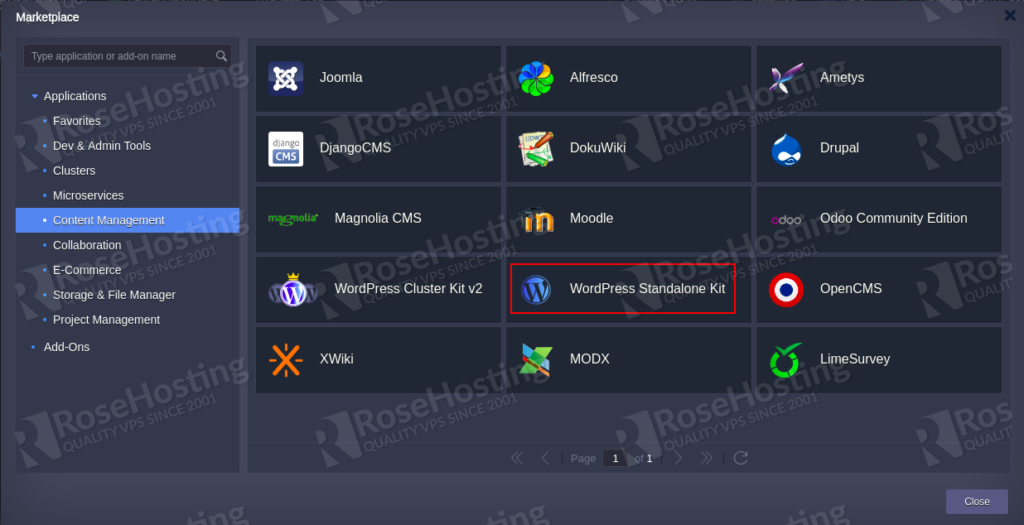
Click on the Content Management in the left pane and click on the WordPress Standalone Kit to install the WordPress on the RoseHosting PaaS. You should see the following screen:
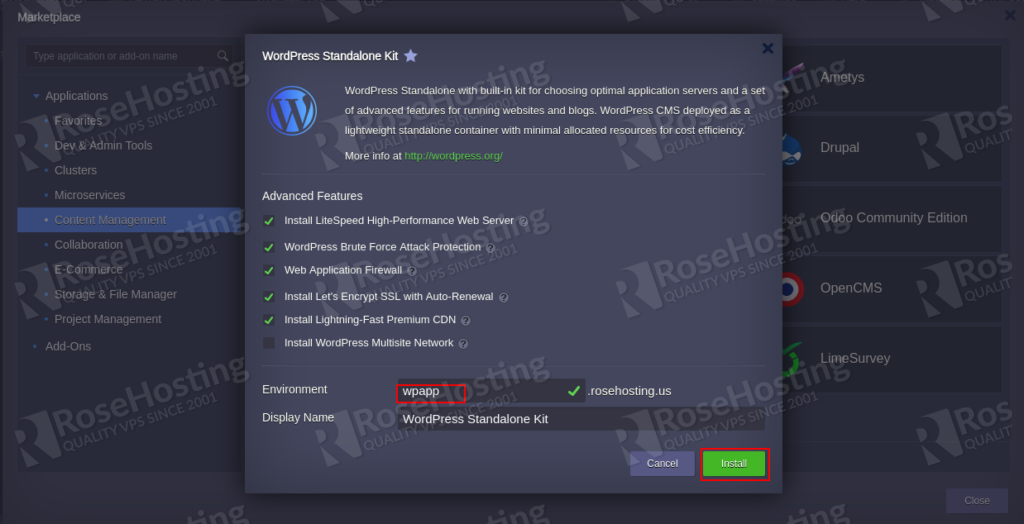
Provide your environment name and click on the Install button. Once the installation has been finished. You should see the following screen with your WordPress website URL and Admin Panel URL:
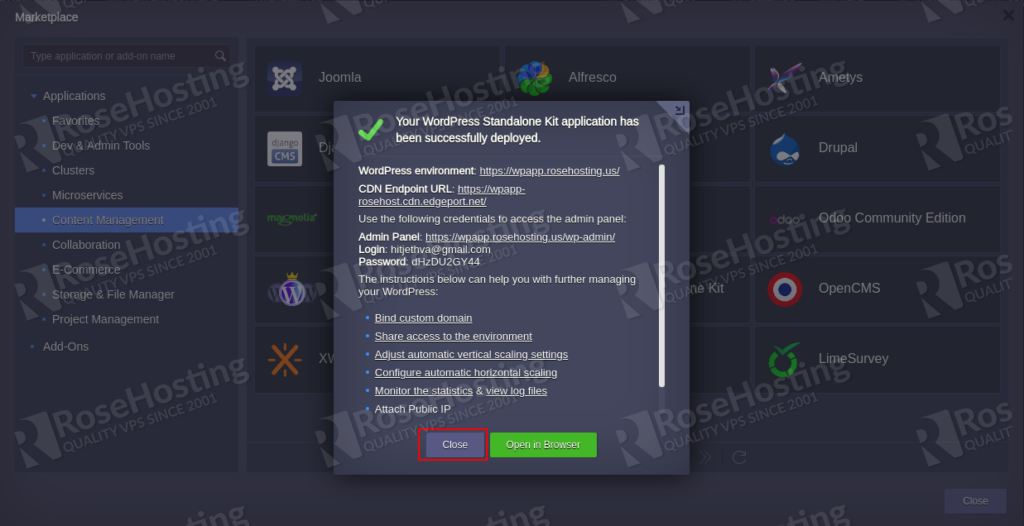
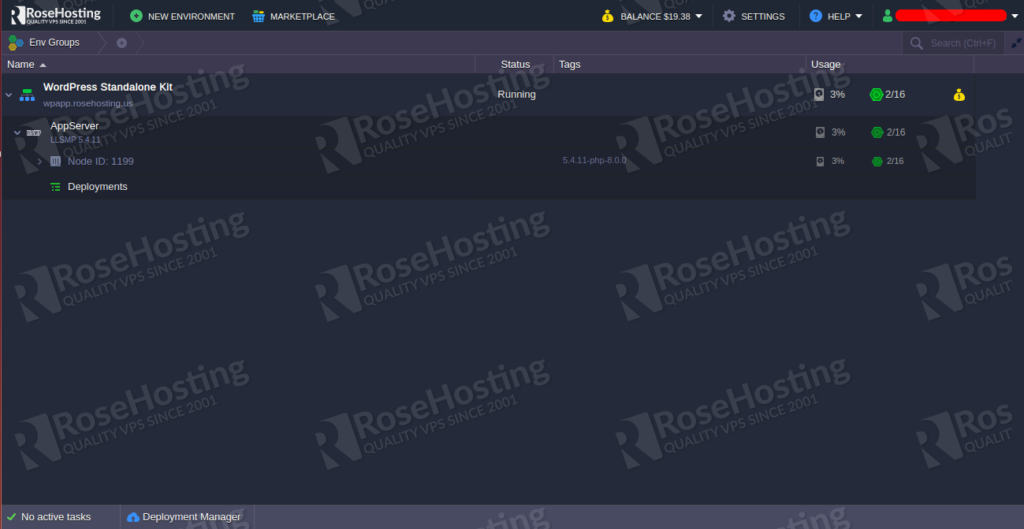
Click on the Close button to exit from the wizard. You should see your WordPress environment in the following screen:
Generate and Add a Public Key to WordPress Environment
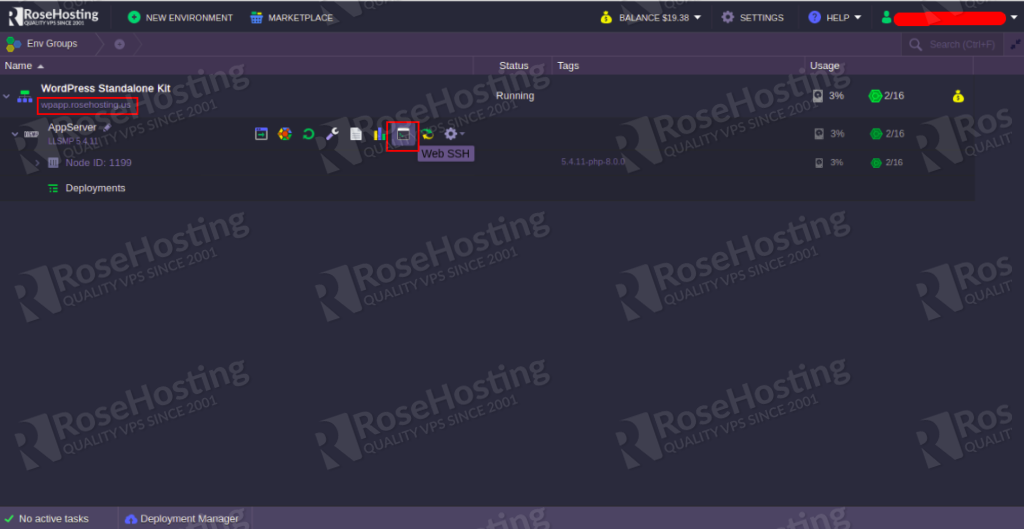
Next, you will need to generate an SSH public key and add it to the WordPress environment.
On the WordPress Environment, hover your mouse on App Server and click on the Web SSH to connect to the App server.
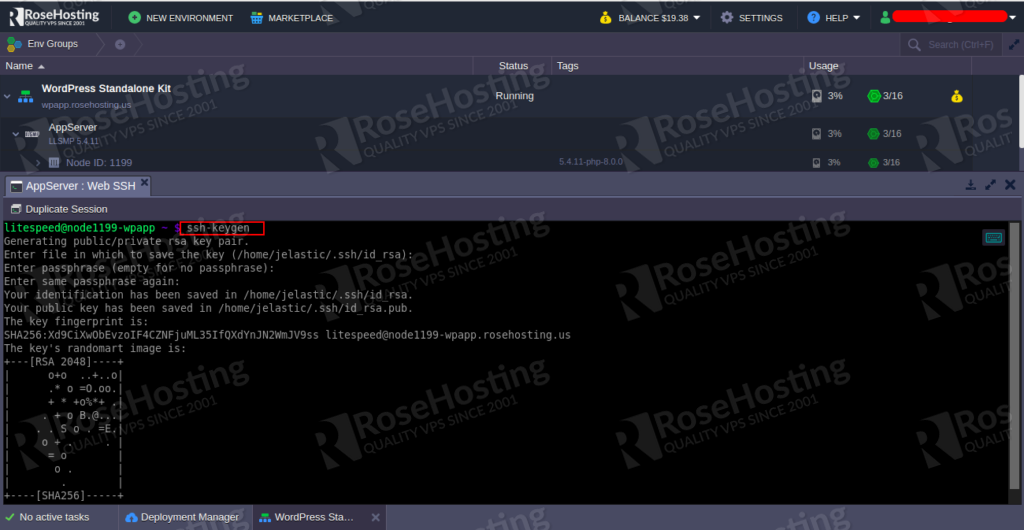
Next, run the ssh-keygen command in the SSH terminal to generate the Public and private key:
Next, next print the content of the Public key with the following command:
cat ~/.ssh/id_rsa.pub
You should see your generated Public key in the following output:
ssh-rsa AAAAB3NzaC1yc2EAAAADAQABAAABAQDUpdE9sRosJ3dMKGmu6iwgpSyk0fNGoGi+fq8Hj9lxbxr74SzNvnXNOPmbVENavUlv5z8yRZNmeiK5+QKtyxu5tbkONU/ihjDwnPSBrr4hdzlTbZpkPjP/DYVcRuS4g5qk/BmaTnCjmI83sVg+AqOUf+CmlfjTY64BvQHY0Ql02Rjl7HAjXJan0+XEwFSZW8Sjk1Lt+sJUrnO0WejxtMULysUJ3K0cHmil90PhI+br812T+nPxGqzuHRXY2jp1QrxHwOjkdhlD6AEuwh6HPiVmUk4pABTxnTfk/868/LvxaiRrFgPXPZUS5QyuEwRb/R6+j9ffry/Qkh7MDamhzY+x litespeed@node1199-wpapp.rosehosting.us

Next, select the generated output and press Ctrl+Shift+С to copy the Public key to the clipboard.
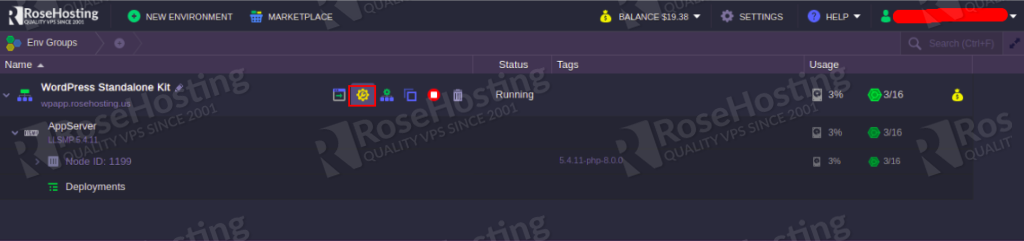
Next, click on the Setting icon on the WordPress Standalone Kit as shown below.
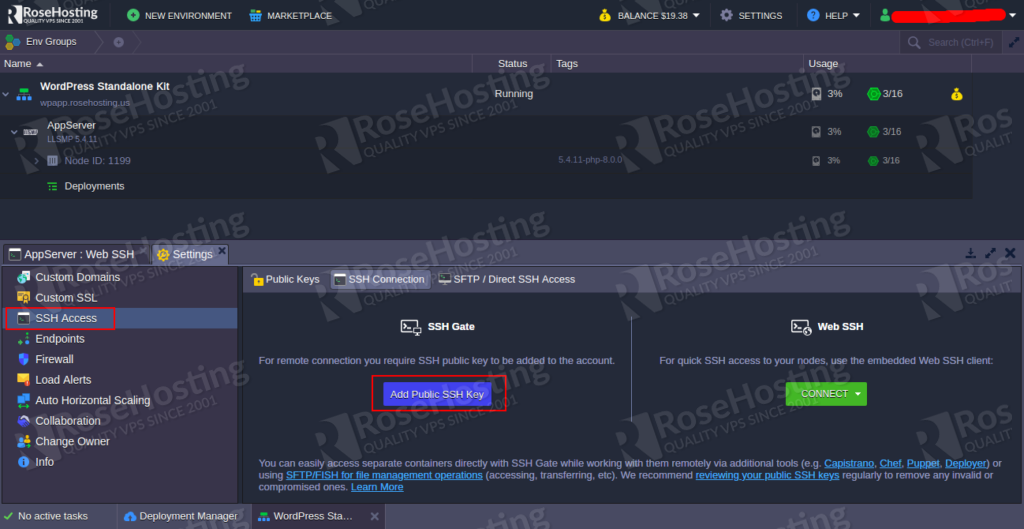
Click on the SSH Access and click on the Add Public SSH Key. You should see the following screen:
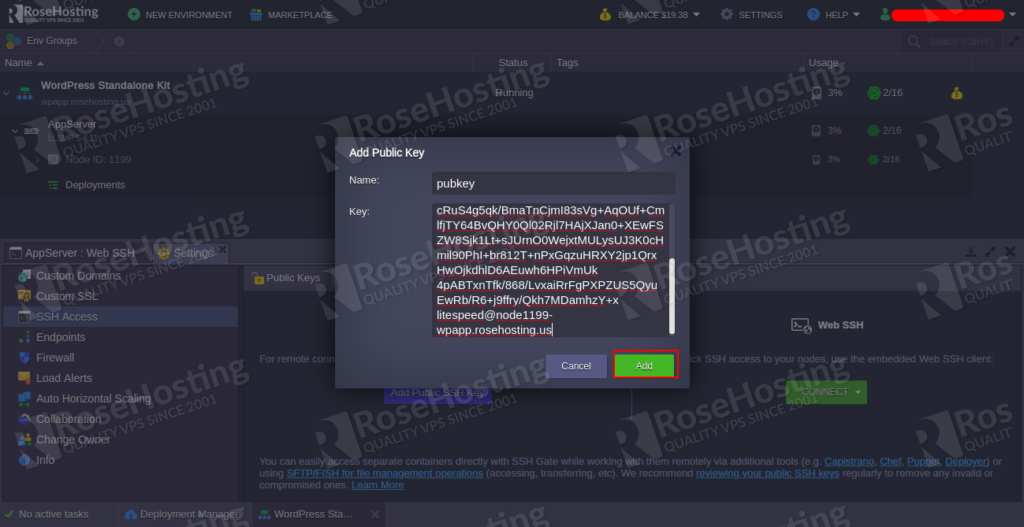
Provide the name of the Public key, paste the Public key from the clipboard and click on the Add button to add the key to the WordPress environment. You should see the following screen:
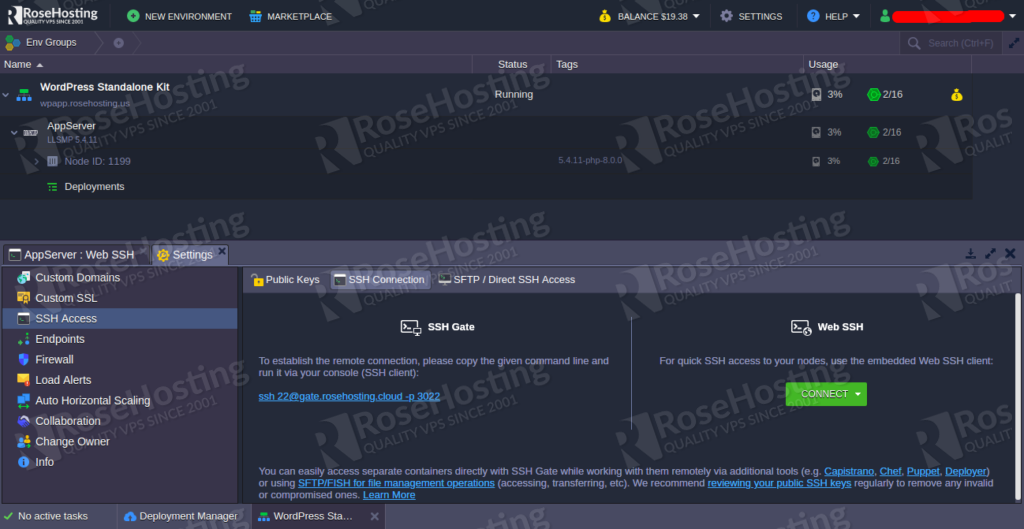
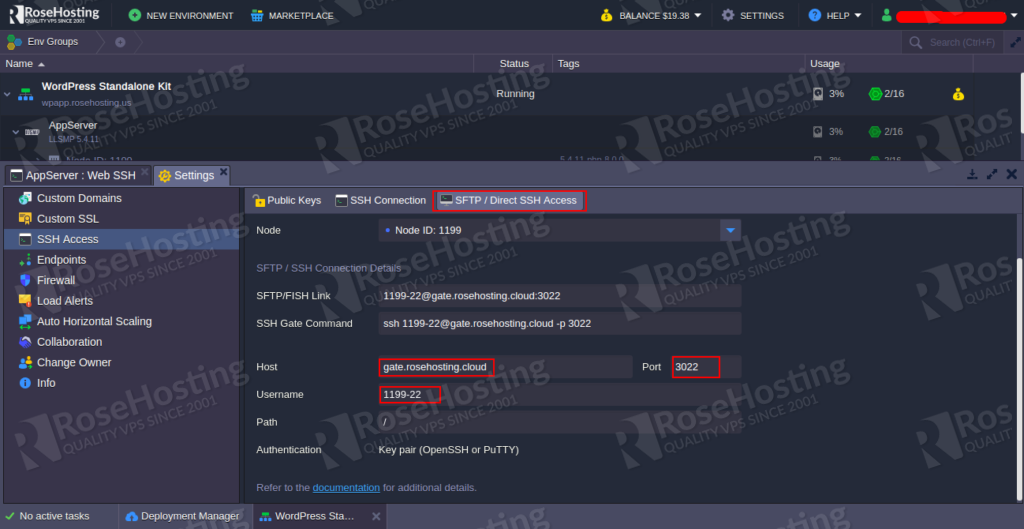
Next, click on the SFTP / Direct SSH Access tab to see the SSH and SFTP credentials:
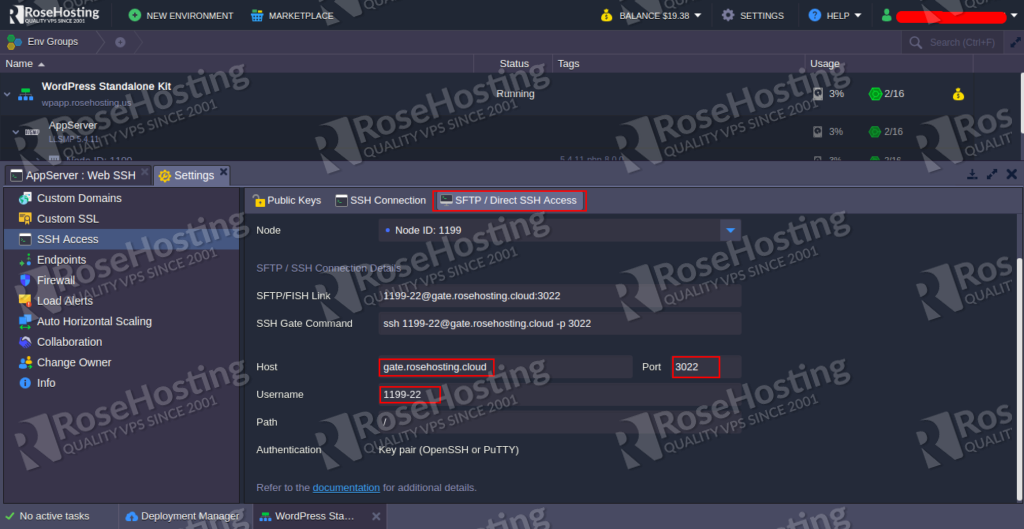
You will need the above details during the migration process.
Migrate WordPress From Source Website to RoseHosting Pass
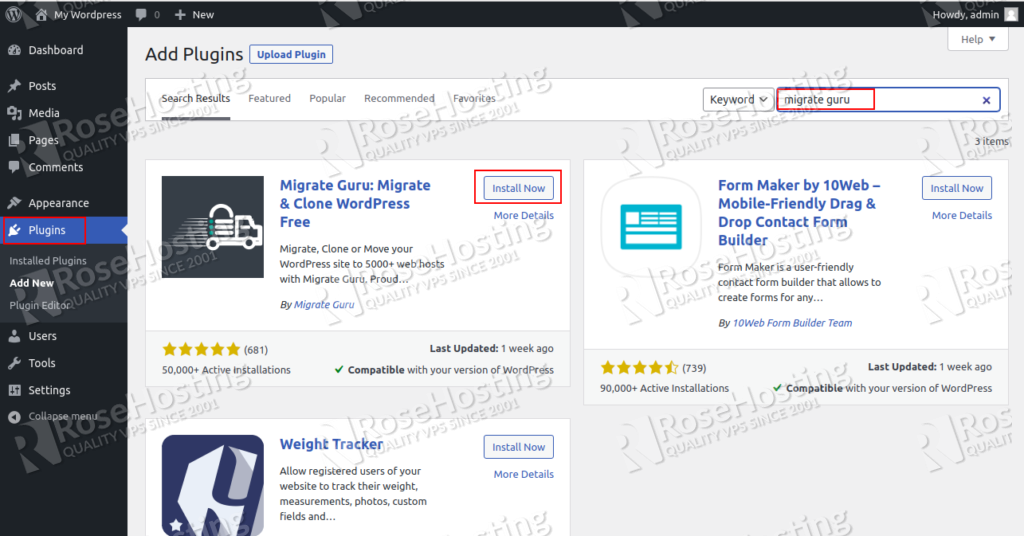
Next, login to the admin panel of the source WordPress website and install the Migrate Guru plugin as shown below:
Once the plugin is installed, you will be redirected to the WordPress Migration wizard:
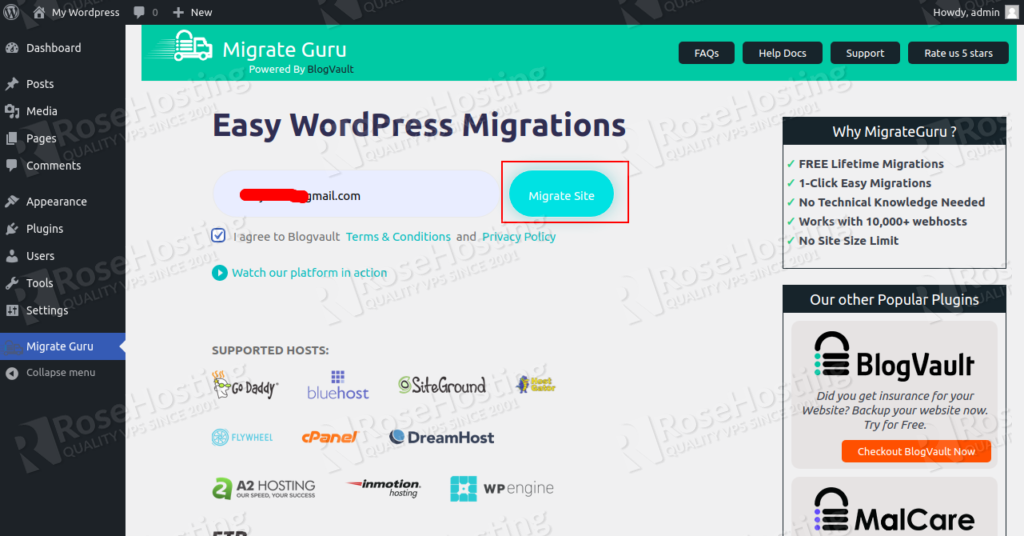
Provide your email address, accept the term and conditions and click on the Migrate Site button. You should see the following screen:
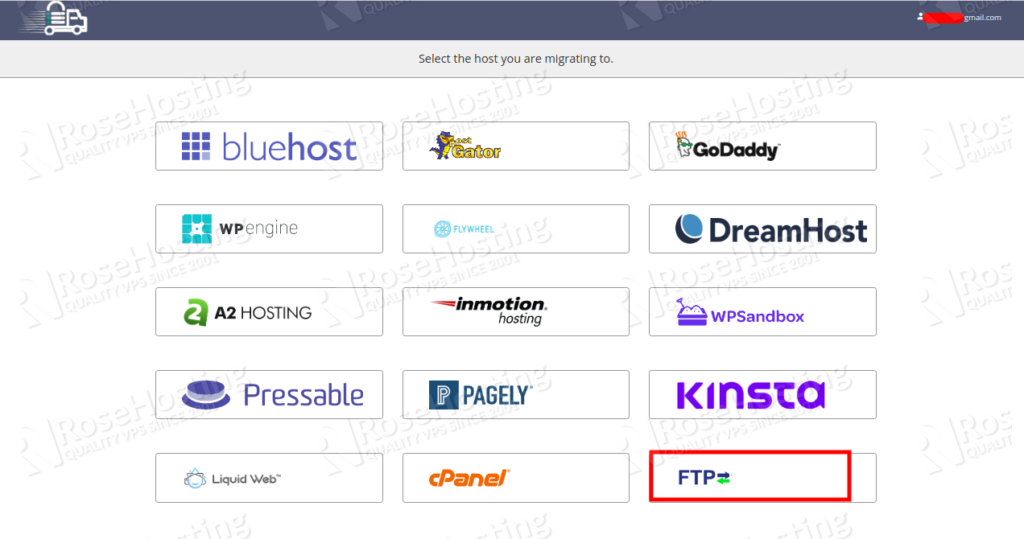
Select the FTP protocol. You will be redirected to the following screen:
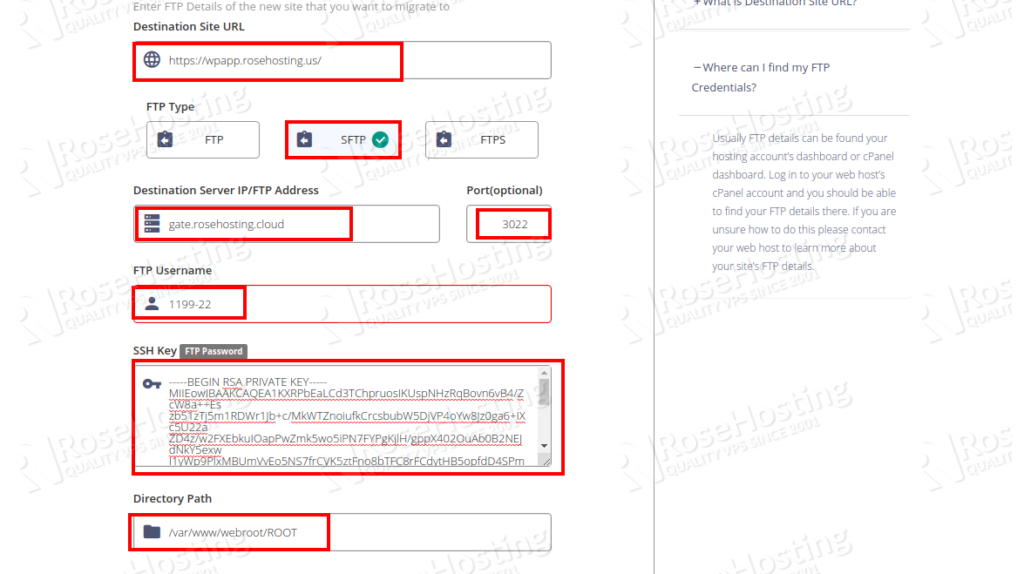
Here, you will need to provide the following details:
Destination Site URL is the new WordPress site URL provided by RoseHosting after environment creation. In this case, it is https://wpapp.rosehosting.us/.
SFTP is the secure file transfer used for the migration process.
Destination Server IP/FTP Address and Port can be found from the following screenshot.
FTP Username can be found from the above screenshot.
SSH Key is the Private key that you will need to copy from the SSH console and paste it in this field.
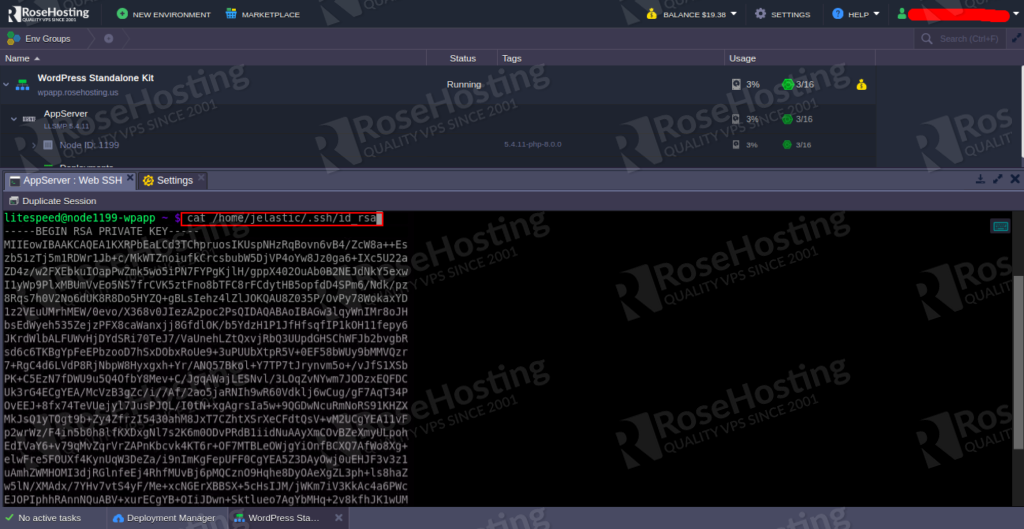
You can print the content of the Private key with the following command:
cat ~/.ssh/id_rsa
Output:
-----BEGIN RSA PRIVATE KEY-----
MIIEowIBAAKCAQEA1KXRPbEaLCd3TChpruosIKUspNHzRqBovn6vB4/ZcW8a++Es
zb51zTj5m1RDWr1Jb+c/MkWTZnoiufkCrcsbubW5DjVP4oYw8Jz0ga6+IXc5U22a
ZD4z/w2FXEbkuIOapPwZmk5wo5iPN7FYPgKjlH/gppX402OuAb0B2NEJdNkY5exw
I1yWp9PlxMBUmVvEo5NS7frCVK5ztFno8bTFC8rFCdytHB5opfdD4SPm6/Ndk/pz
8Rqs7h0V2No6dUK8R8Do5HYZQ+gBLsIehz4lZlJOKQAU8Z035P/OvPy78WokaxYD
1z2VEuUMrhMEW/0evo/X368v0JIezA2poc2PsQIDAQABAoIBAGw3lqyWnIMr8oJH
bsEdWyeh535ZejzPFX8caWanxjj8GfdlOK/b5YdzH1P1JfHfsqfIP1kOH11fepy6
JKrdWlbALFUWvHjDYdSRi70TeJ7/VaUnehLZtQxvjRbQ3UUpdGHSChWFJb2bvgbR
sd6c6TKBgYpFeEPbzooD7hSxDObxRoUe9+3uPUUbXtpR5V+0EF58bWUy9bMMVQzr
7+RgC4d6LVdP8RjNbpW8Hyxgxh+Yr/ANQ57Bkol+Y7TP7tJrynvm5o+/vJfS1XSb
PK+C5EzN7fDWU9u5Q4OfbY8Mev+C/JgqAWajLESNvl/3LOqZvNYwm7JODzxEQFDC
Uk3rG4ECgYEA/McVzB3gZc/i//Af/2ao5jaRNIh9wR60Vdklj6wCug/gF7AqT34P
OvEEJ+8fx74TeVUejyl7JusPJQL/I0tN+xgAgrsIa5w+9QGDwNcuRmNoRS91KHZX
MkJsQ1yTOgt9b+Zy4ZfrzI5430ahM8JxT7CZhtXSrXeCFdtQsV+vM2UCgYEA11vF
p2wrWz/F4in5b0h8lfKXDxgNl7s2K6m0ODvPRdB1iidNuAAyXmCOvBZeXmyULpoh
EdIVaY6+v79qMvZqrVrZAPnKbcvk4KT6r+OF7MTBLeOWjgYiOnfBCXQ7AfWo8Xg+
elwFre5FOUXf4KynUqW3DeZa/i9nImKgFepUFF0CgYEA5Z3DAyOwj0uEHJF3v3z1
uAmhZWMHOMI3djRGlnfeEj4RhfMUvBj6pMQCznO9Hqhe8DyOAeXgZL3ph+ls8haZ
w5lN/XMAdx/7YHv7vtS4yF/Me+xcNGErXBBSX+5cHsIJM/jWKm7iV3KkAc4a6PWc
EJOPIphhRAnnNQuABV+xurECgYB+OIiJDwn+Sktlueo7AgYbMHq+2v8kfhJK1wUM
rGlYZsxtM4oGnP7od7lQnd+jggn7olRdiH8KRiKgacUJp4lwnz1up/iwD3/O9oMD
UdvtoIgEqE5WYVvwXr3iF6B6Dox9MleUCZk+jtc9sSl9GlRbSUsXt3p/XjMZYSqo
jZXH9QKBgA5ouAwSwPfxoJr9rt/1+fVQUGc7uZRJwZAFEiANsgFoMHsoupwrgmsm
jdFEfNJ8n3VaeMll9UGe567ePosATnyf9cZ5WBUFd3yj6HSjUEEKJ9Ajz5EwGGyx
VxZhbaTFkJgnHdkgqI3yeUPxed2D1m6o3rfRlSsauuCz3Li7fZEQ
-----END RSA PRIVATE KEY-----
Directory Path is the path of your WordPress installation. By default, it will be /var/www/webroot/ROOT/
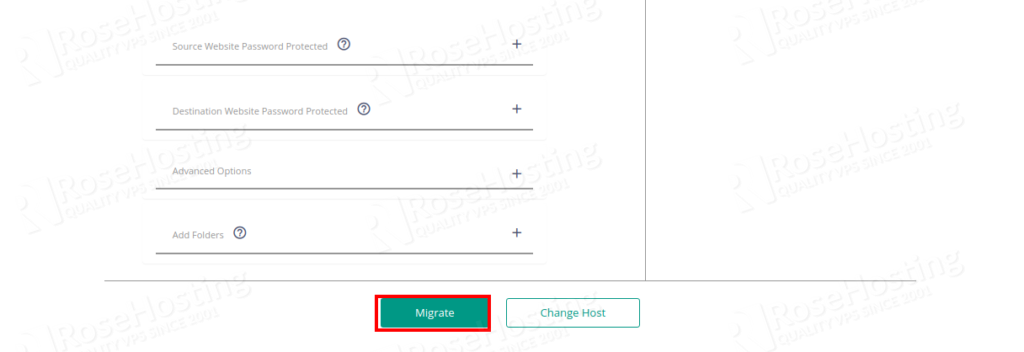
Finally, scroll down and press the Migrate button.
Once the Migration process has been completed successfully. You should see the following screen:
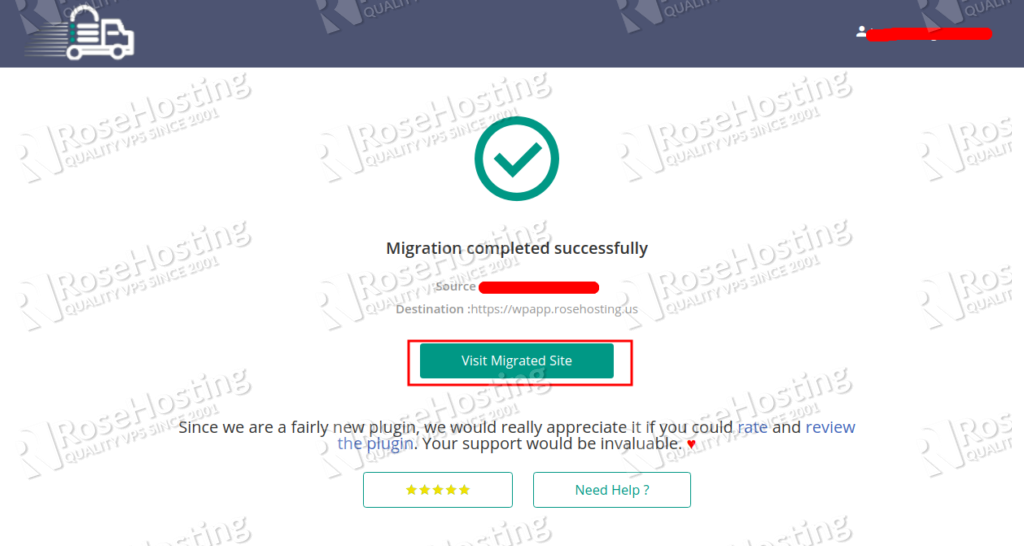
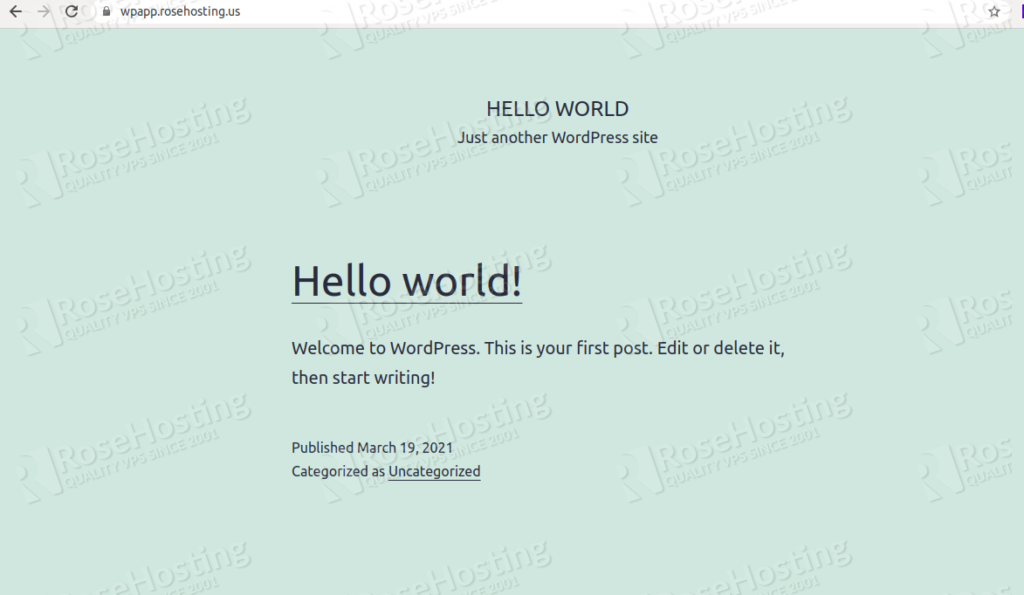
Click on the Visit Migrated Site. You will be redirected to your new WordPress website as shown below:
You don’t really need to migrate your WordPress site yourself if you use our WordPress Cloud Hosting Solution. Simple submit a ticket and our award-winning system aministrators will migrate it, in no time.
PS. If you liked this post please share it with your friends on the social networks using the buttons on the left or simply leave a reply below. Thanks.
This article is quite useful and instructive. Thank you for your assistance.