A cron job is a Linux command that’s executed at regular intervals. These “jobs” can be scheduled via the command line, but it’s much easier to do it via the cPanel GUI interface. cPanel also conveniently shows the number of existing cron jobs, and it can also send the output of the command via e-mail. In this tutorial, we’ll show you how to schedule cron jobs easily and efficiently.
Table of Contents
Step 1: Go to the Cron Job Page in cPanel
The first step is to log in to cPanel and scroll down till you find the section labeled “Advanced” and then select “Cron Jobs” as shown here.
Now let’s create the job.
Step 2: Choose E-Mail Settings and the Schedule
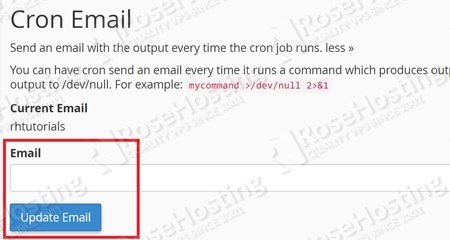
You have an option in cPanel to send out an e-mail whenever this particular cron job runs. It can be useful if you need to keep track of certain commands you use. In the following section, enter an e-mail address if you want:
Choosing the Schedule
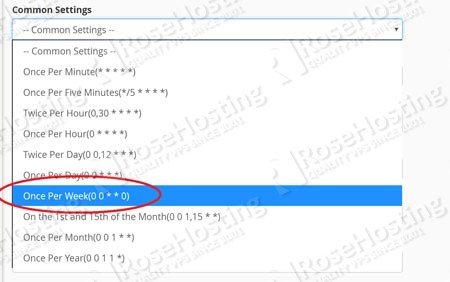
This drop-down box allows you to quickly select some common schedules for your job. Most of the time, you can get by with just selecting one of the pre-selected options. Here for example, we choose to run the command once a week with the default settings:
In case you want something more sophisticated, here’s an explanation of what the fields mean.
As labeled in the text boxes, you can enter values for the following:
- Minute – 00 to 59
- Hour – 0 to 23
- Day – 1 to 31
- Month – 1 to 12
- Weekday – 0 to 6
These five values will allow you to create any kind of complicated schedule you want. Each of these fields takes a value that applies to it. So to take “Weekday” as an example, a value of “0” means Sunday, “1” is Monday and so forth.
Using an asterisk, or star (*) in the field means that it doesn’t matter what the value is. The job will run when the date and time on the server matches all the values specified. Any value with a star (*) will be matched by default.
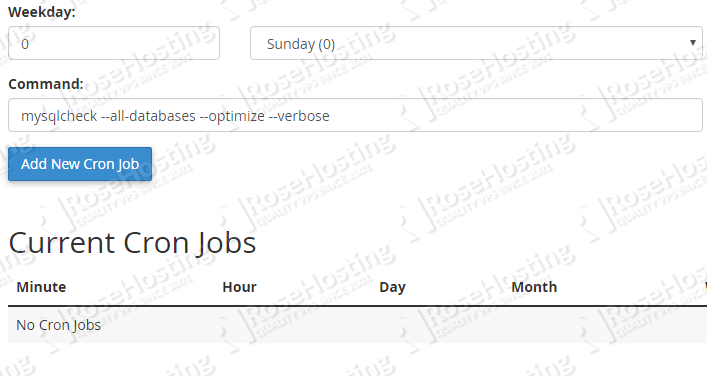
In the example above, we wanted the job to run once every week. So the only thing we needed to specify was the weekday – in this case 0. We also want to make sure that the job runs only once on Sunday, and not every minute, so we specify the minute and hour as well. Put together, “once a week” can be written as:
0 0 * * 0
It’s that simple!
Step 3: Specifying the Command
Once you’ve got the schedule you want, type the Linux command you want to run into the box labeled “Command”. In this example, we choose to run the following:
mysqlcheck --all-databases --optimize --verbose
This command optimizes all the databases on all websites hosted on the server.
Suppressing the Output and Error Messages
Many Linux commands dump an output into the terminal. Sometimes these messages can get very long indeed. If you choose to receive e-mail notifications, it can get extremely annoying.
You can suppress normal, regular output of a Linux command by appending the following after it:
>/dev/null
So the command above will become:
mysqlcheck --all-databases --optimize --verbose >/dev/null
However, this will not suppress error messages. And that’s something useful to have. While you can ignore regular output, you probably want to be notified if something went wrong. However, we can suppress error messages as well by adding the following to the end of commands:
>/dev/null 2>&1
The extra “2>&1” redirects error messages to the standard output which we have automatically ignored with the previous “>/dev/null”.
So you can pick and choose exactly what you want to see when your command runs.
Now just click “Add New Cron Job” after entering the command and you’re done! You have successfully setup up a cron job in Linux!
If you use one of our Managed cPanel VPS Hosting, you don’t have to schedule cron jobs in cPanel, simply ask our technical support and they will schedule any cron job for you. They are available 24/7.
If you liked this post on how to schedule cron jobs in cPanel, feel free to share it with your friends by using the social media share shortcuts below, or simply leave a comment. Thanks.


