In this tutorial, we’ll be covering how you can install WordPress in a subdirectory and at the same time leave the parent domain name or WordPress instance unaffected.

Table of Contents
Step 1: Installation of WordPress
We can now start with the WordPress installation. We are going to download and place the WordPress installation in the default web server document root directory (/var/www/html).
Now you should move to this directory with:
cd /var/www/html
then download the latest WordPress installation from the official wordpress.org site with wget:
wget -c http://wordpress.org/latest.zip
after that you should extract the file with:
unzip latest.zip
All the WordPress files would be now placed in the wordpress directory in /var/www/html/wordpress .
We should also set the correct permissions of this directory so our Apache web server can access these files. In order to grant ownership of the WordPress files to our Apache web server, run the following command:
chown -R www-data:www-data /var/www/html/wordpress
Step 2: How to Create a Database for WordPress
Now, we are going to create our MySQL database for our WordPress site. First, you should do is to log in to your MySQL server with the following command and enter your MySQL root password:
mysql -u root -p
Then to create a new database for our WordPress installation, run the following commands:
CREATE DATABASE wordpress_db;
GRANT ALL PRIVILEGES ON wordpress_db.* TO 'wordpress_user'@'localhost' IDENTIFIED BY 'PASSWORD';
FLUSH PRIVILEGES;
exit;
The database name (wordpress_db) and the MySQL username (wordpress_user) can be replaced with your own names. You need to change “PASSWORD” with an actual, strong password.
Now that the database creation is done, we need to attach this information to the WordPress configuration file.
Make sure you are inside the /var/www/html/wordpress directory and run the following command to rename the sample configuration file:
mv wp-config-sample.php wp-config.php
Now open the wp-config.php file with your favourite text editor, for example:
nano wp-config.php
And update the database settings, replacing database_name_here, username_here and password_here with your own details:
// ** MySQL settings - You can get this info from your web host ** //
/** The name of the database for WordPress */
define('DB_NAME', 'wordpress_db');

/** MySQL database username */
define('DB_USER', 'wordpress_user');

/** MySQL database password */
define('DB_PASSWORD', 'PASSWORD');

/** MySQL hostname */
define('DB_HOST', 'localhost');

/** Database Charset to use in creating database tables. */
define('DB_CHARSET', 'utf8');

/** The Database Collate type. Don't change this if in doubt. */
define('DB_COLLATE', '');
You need to save and then exit the file.
Next, what you need to do is to restart your Apache and MySQL server with:
systemctl restart apache2
systemctl restart mysql
When you finish that, you can now enter your WordPress instance and finish the installation by following the on-screen instructions in your browser at http://your_server_ip_address/wordpress
Step 3: Create a Subdirectory under the Root Domain Name
First, you need to create a subdirectory or folder under your domain root directory. That will be the place where you will put the new WordPress files.
Once you are logged in, you need to move to the root folder of your website. Usually it is the /var/www/html/wordpress folder. If you already have WordPress placed in the root folder, then you should be able to see your WordPress files and subfolders there.
It is good to pay more attention by selecting the name for your subdirectory. It will be a segment of your new WordPress site’s URL and what your users will type in their browsers to get to this website.
For example, if you choose to title this directory “blog”, then your WordPress website’s address will be:
http://your_domain.com/blog/
Step 4: Enabling Multisite mode
To enable Multisite mode, you need to edit the parent instance’s configuration file, like so:
nano /var/www/html/wordpress/wp-config.php
Once opened with our editor, we have to locate the line that says:
/* That's all, stop editing! Happy blogging. */
And above, we will add the following lines:
/** Multisite */
define('WP_ALLOW_MULTISITE', true);
Done! Once saved, we can go back to our WordPress admin panel.
Step 5: Network Setup
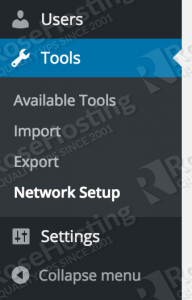
If we refresh our admin page, we should now find Network Setup under the Tools menu:
In this new Network Setup section, we decide if we want to install Multisite to work with Subdomains or Subdirectories. In our case, we check the Subdirectories option. Optionally we can name our network websites as well. Then, click on the Install button.
Complete the following steps to enable the features for creating a network of sites.
Caution: We recommend you back up your existing wp-config.php and .htaccess files.
Add the following to your wp-config.php file in /var/www/html/wordpress/ above the line reading /* That’s all, stop editing! Happy blogging. */:
define('MULTISITE', true);
define('SUBDOMAIN_INSTALL', false);
define('DOMAIN_CURRENT_SITE', 'yourdomain.com');
define('PATH_CURRENT_SITE', '/');
define('SITE_ID_CURRENT_SITE', 1);
define('BLOG_ID_CURRENT_SITE', 1);
This is what we ended up having in our wp-config.php:
/** Multisite */
define('WP_ALLOW_MULTISITE', true);
define('MULTISITE', true);
define('SUBDOMAIN_INSTALL', false);
define('DOMAIN_CURRENT_SITE', 'yourdomain.com');
define('PATH_CURRENT_SITE', '/');
define('SITE_ID_CURRENT_SITE', 1);
define('BLOG_ID_CURRENT_SITE', 1);
/* That's all, stop editing! Happy blogging. */
Save and edit that file, then go to your .htaccess file and replace the contents of it with these lines:
RewriteEngine On
RewriteBase /
RewriteRule ^index\.php$ - [L]

# add a trailing slash to /wp-admin
RewriteRule ^([_0-9a-zA-Z-]+/)?wp-admin$ $1wp-admin/ [R=301,L]

RewriteCond %{REQUEST_FILENAME} -f [OR]
RewriteCond %{REQUEST_FILENAME} -d
RewriteRule ^ - [L]
RewriteRule ^([_0-9a-zA-Z-]+/)?(wp-(content|admin|includes).*) $2 [L]
RewriteRule ^([_0-9a-zA-Z-]+/)?(.*\.php)$ $2 [L]
RewriteRule . index.php [L]
Once we go back to our WordPress Dashboard, we should see our new “My sites” section.
Now, the WordPress Multisite with subdirectories feature has been fully enabled and configured.
All that needs to be done is to go to the dashboard and create your sites.

PS. If you liked this post on how to set up WordPress multisite with subdirectories, or if you found it helpful, please share it with your friends on social networks or simply leave a comment in the comments section. Thanks.


Hello, thanks.
I have kind of a huge problem though:
On www.domain.com I have prestashop, so that space was busy.
I therefor had already installed wordpress on:
www.domain.com/blog/
Today I enabled multisite, and I wanted to keep my blog on www.domain.com/blog. This works as before, BUT when I try to add another site, it automatically is created on www.domain.com/blog/blog2/
I want the new sites to be on:
www.domain.com/blog2 and so on.
I don’t want my primary blog address to be the “host” for the new sites.
As in: NOT www.domain.com/blog/blog2, but www.domain.com/blog2
It seems you might know your way around, so do you have any suggestions to fix this?
In my wpconfig I have now:
define(‘MULTISITE’, true);
define(‘SUBDOMAIN_INSTALL’, false);
define(‘DOMAIN_CURRENT_SITE’, ‘yourdomain.com’);
define(‘PATH_CURRENT_SITE’, ‘/blog’);
define(‘SITE_ID_CURRENT_SITE’, 1);
define(‘BLOG_ID_CURRENT_SITE’, 1);
I tried changing this to your example:
define(‘PATH_CURRENT_SITE’, ‘/’);
And the main blog and it’s admin still works, but not the network-admin.
Please make sure that Site Address (URL) and WordPress Address (URL) are properly set.