This tutorial will explain how to set up WordPress Multisite with an OpenLiteSpeed web server on Ubuntu 24.04 OS.
WordPress is a free and open-source content management system written in PHP that uses MySQL to store data and Apache, Nginx, or OpenLiteSpeed as a web server. OpenLiteSpeed is a high-performance, lightweight, open-sourced HTTP web server that helps your site load faster than any other web server. A WordPress multisite configuration enables multiple websites on the same WordPress installation.
Everything we explained above will be installed in the following paragraphs in less than half an hour. Let’s get started!
Table of Contents
Prerequisites
- A server with Ubuntu 24.04 as OS
- User privileges: root or non-root user with sudo privileges
- Minimum server requirements are 4x CPU and 4GB of RAM (Our NVMe 4 VPS plan)
Step 1. Update the System
For this installation, we need a fresh server, and after a clean installation of the OS, we need to update the system packages to the latest available version. To do that, you need to execute the following commands:
sudo apt update -y && sudo apt upgrade -y
Step 2. Install OpenLiteSpeed
First, we need to download the repository for the OpenLiteSpeed installation with the following command:
wget -O openlitespeed.sh https://repo.litespeed.sh
Once the repo is added, we need to add the OpenLiteSpeed repo to the APT sources:
sudo bash openlitespeed.sh
You will get the following output:
root@host:~# sudo bash openlitespeed.sh
LiteSpeed repository has been setup!
Once the repo is added, we can proceed with the installation process:
sudo apt install openlitespeed -y
Once the installation is complete, we need to start and enable the lshttpd OpenLiteSpeed service:
sudo systemctl start lshttpd && sudo systemctl enable lshttpd
To check the status of the OpenLiteSpeed service, you need to use the following command:
sudo systemctl status lshttpd
You should get output similar to this:
root@host:~# sudo systemctl status lshttpd
● lshttpd.service - OpenLiteSpeed HTTP Server
     Loaded: loaded (/etc/systemd/system/lshttpd.service; enabled; preset: enabled)
     Active: active (running) since Tue 2024-09-17 18:01:54 CDT; 4min 5s ago
   Main PID: 3935 (litespeed)
     CGroup: /system.slice/lshttpd.service
             ├─3935 "openlitespeed (lshttpd - main)"
             ├─3946 "openlitespeed (lscgid)"
             ├─3975 "openlitespeed (lshttpd - #01)"
             ├─3976 "openlitespeed (lshttpd - #02)"
             └─3977 "openlitespeed (lshttpd - #03)"

Sep 17 18:01:52 host.test.vps systemd[1]: Starting lshttpd.service - OpenLiteSpeed HTTP Server...
Sep 17 18:01:52 host.test.vps lswsctrl[3908]: [OK] litespeed: pid=3935.
Step 3. Access the OpenLiteSpeed Admin dashboard
When we install OpenLiteSpeed, we can access it using the URL http://YourIPAddress:7080. As you can see, it is accessible via the server IP address and port 7080. Before we access it, we need to create an admin username and password. To do that, you need to execute the following command, which will invoke the script made for that:
sudo bash /usr/local/lsws/admin/misc/admpass.sh
Once you execute this command, there will be Username input for your username (admin is the default one, and you can hit enter to proceed) and Password.
root@host:~# sudo bash /usr/local/lsws/admin/misc/admpass.sh

Please specify the user name of administrator.
This is the user name required to login the administration Web interface.

User name [admin]: You can hit Enter here, admin is the default username

Please specify the administrator's password.
This is the password required to login the administration Web interface.

Password: YourStrongPasswordHere
Retype password: YourStrongPasswordHere
Administrator's username/password is updated successfully!
After this is set up, you can access the OpenLiteSpeed in the browser at the following URL: http://YourIPAddress:7080 using the credential you set before

Once logged in, you will see the following dashboard.
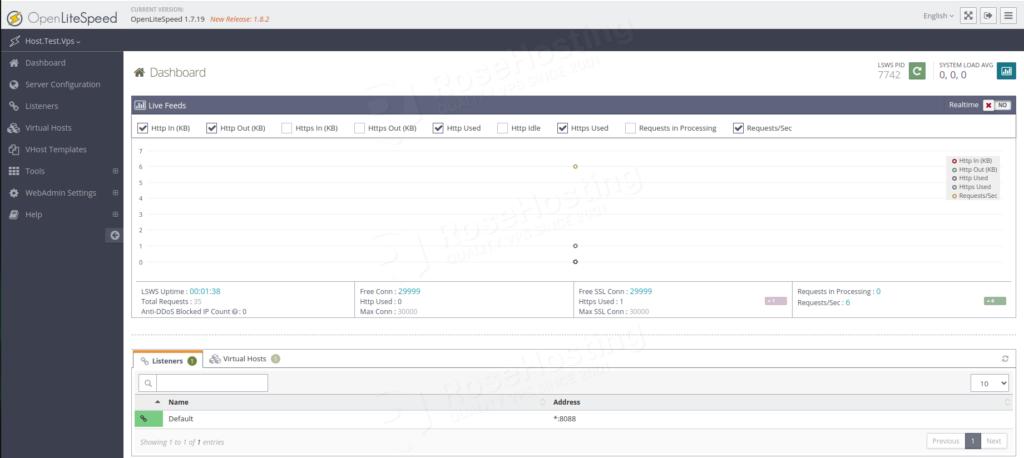
Now, it is recommended that the listening port of the OpenLiteSpeed server be changed from port 8088 to 80.
To do that, on the left menu, click on Listeners —> View

Then click on the edit button:

Change the port to 80 and click the save icon (top right corner).

Once done, restart the OpenLiteSpeed service.

Now, we will proceed with MySQL installation and configuration, followed by the WordPress installation. Once this is done, we will have to make some OpenLiteSpeed configurations. Let’s proceed with the next step.
Step 4. MariaDB installation and Database creation
To install the MariaDB database server, execute the following command:
sudo apt install mariadb-server -y
Once installed, start and enable the MariaDB database service:
sudo systemctl start mariadb && sudo systemctl enable mariadb
To check the status of the service, execute the command below:
sudo systemctl status mariadb
You should get the following output:
root@host:~# sudo systemctl status mariadb
● mariadb.service - MariaDB 10.11.8 database server
     Loaded: loaded (/usr/lib/systemd/system/mariadb.service; enabled; preset: enabled)
     Active: active (running) since Wed 2024-09-18 10:37:23 CDT; 1min 49s ago
       Docs: man:mariadbd(8)
             https://mariadb.com/kb/en/library/systemd/
   Main PID: 11115 (mariadbd)
     Status: "Taking your SQL requests now..."
      Tasks: 10 (limit: 30450)
     Memory: 78.6M (peak: 82.1M)
        CPU: 1.175s
     CGroup: /system.slice/mariadb.service
             └─11115 /usr/sbin/mariadbd
Now, let’s create a database and database user for WordPress installation:
CREATE DATABASE wpdatabase;
CREATE USER 'wpuser'@'localhost' IDENTIFIED BY 'StrongPasswordHere';
GRANT ALL ON wpdatabase.* TO 'wpuser'@'localhost' WITH GRANT OPTION;
FLUSH PRIVILEGES;
EXIT;
Step 5. PHP installation
Next is to install the PHP with its extensions so WordPress can function properly. To install PHP with its extensions, execute the following command:
sudo apt install lsphp83 lsphp83-mysql lsphp83-common lsphp83-curl lsphp83-imagick -y
Step 6. Download and install WordPress
We will download WordPress into the default document root of the OpenLiteSpeed. To do that, first, navigate to:
cd /usr/local/lsws/Example/html/
Download wordpress with the following command:
wget https://wordpress.org/latest.zip
Unzip the WordPress files:
unzip latest.zip
The wordpress files will be extracted in the following directory:
/usr/local/lsws/Example/html/wordpress
Now, we need to set up the correct permissions:
chown -R nobody:nogroup /usr/local/lsws/Example/html/wordpress
Next is to navigate to the WordPress directory and configure the database settings in the wp-config.php file:
cd /usr/local/lsws/Example/html/wordpress

mv wp-config-sample.php wp-config.php

nano wp-config.php
Find these lines of code and adjust them with the database credentials you set before in Step 4.
/** The name of the database for WordPress */
define('DB_NAME', 'wpdatabase');

/** MySQL database username */
define('DB_USER', 'wpuser');

/** MySQL database password */
define('DB_PASSWORD', 'StrongPasswordHere');

/** MySQL hostname */
define('DB_HOST', 'localhost');
Save the file and close it.
Step 7. Configure OpenLiteSpeed
Now, we need to configure OpenLiteSpeed to see the new path usr/local/lsws/Example/html/wordpress so the website can be accessible in the browser.
Go back to the OpenLiteSpeed dashboard, navigate to Virtual Hosts > Example > General, and modify the input to look like the picture below.
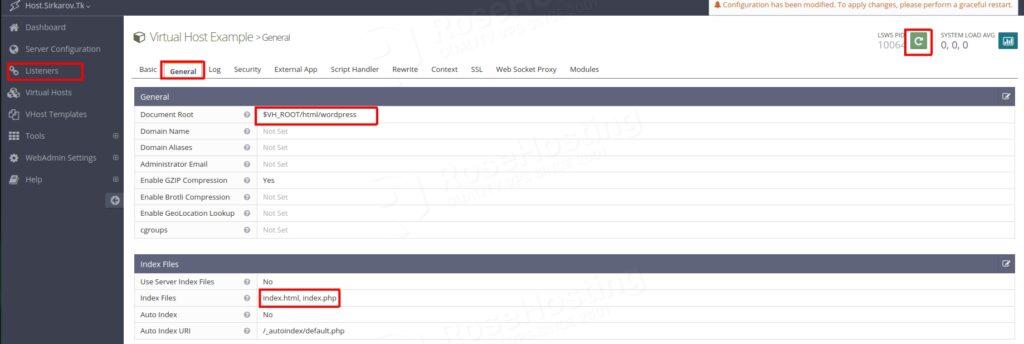
Restart the OpenLiteSpeed service and access your server IP address in the browser so you can finish the WordPress installation.
Step 8. Finish WordPress Installation
To finish the WordPress installation, choose the language and click Continue

On the next window, enter your site title, username, password, and your email:

Once done, you will be redirected to log in to the WordPress dashboard with the credentials you set. Once logged in you will get the following screen:

Step 9. Configure WordPress Multisite
This is the last and the most crucial step of this post. To enable multisite in WordPress, you need to do the following:
First, we need to enable the multisite in WordPress by clicking on Tools —> Network Setup —> Install
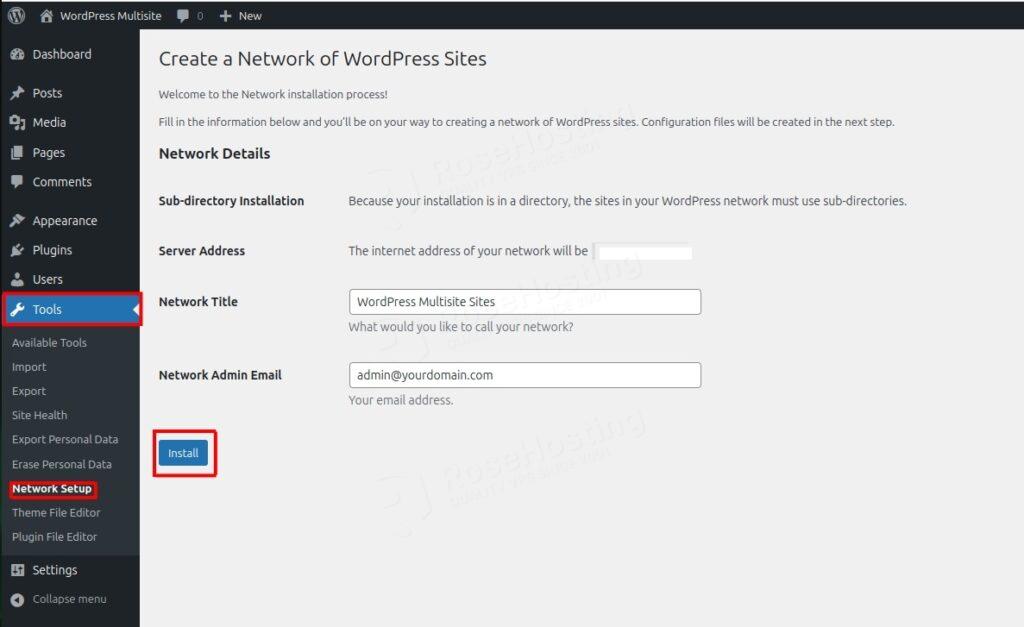
Once done, you will receive the following screen:
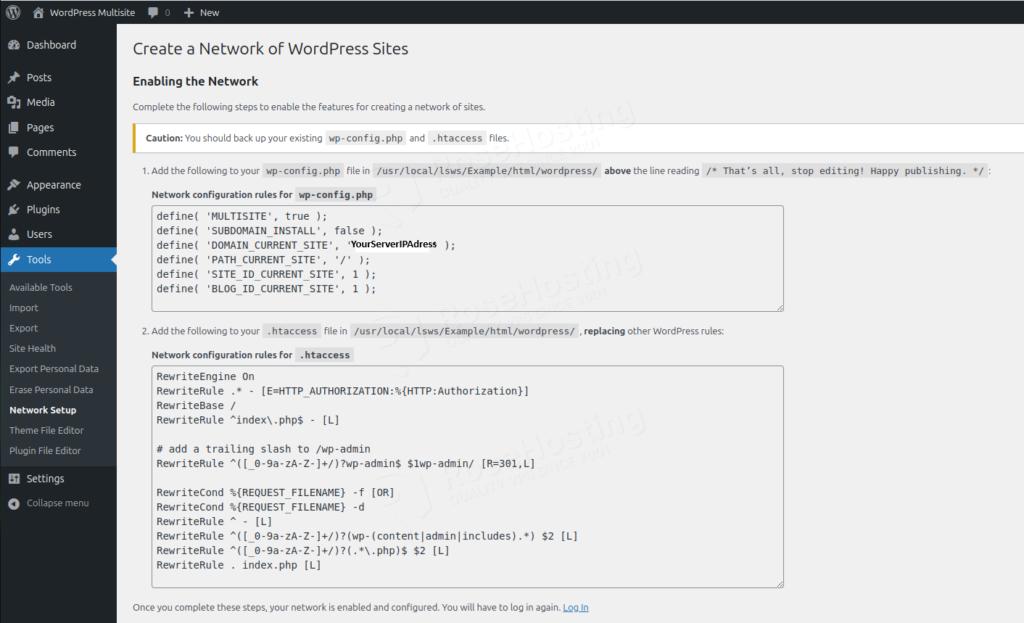
Open the wp-config.php file again and add these lines as the screenshot explains.
define( 'MULTISITE', true );
define( 'SUBDOMAIN_INSTALL', false );
define( 'DOMAIN_CURRENT_SITE', 'YourServerIPAddress' );
define( 'PATH_CURRENT_SITE', '/' );
define( 'SITE_ID_CURRENT_SITE', 1 );
define( 'BLOG_ID_CURRENT_SITE', 1 );
Please save the file and close it.
Next is to replace all lines in the .htaccess with the following lines of code:
RewriteEngine On
RewriteRule .* - [E=HTTP_AUTHORIZATION:%{HTTP:Authorization}]
RewriteBase /
RewriteRule ^index\.php$ - [L]

# add a trailing slash to /wp-admin
RewriteRule ^([_0-9a-zA-Z-]+/)?wp-admin$ $1wp-admin/ [R=301,L]

RewriteCond %{REQUEST_FILENAME} -f [OR]
RewriteCond %{REQUEST_FILENAME} -d
RewriteRule ^ - [L]
RewriteRule ^([_0-9a-zA-Z-]+/)?(wp-(content|admin|includes).*) $2 [L]
RewriteRule ^([_0-9a-zA-Z-]+/)?(.*\.php)$ $2 [L]
RewriteRule . index.php [L]
Save the file, close it, refresh the website, and log in again.
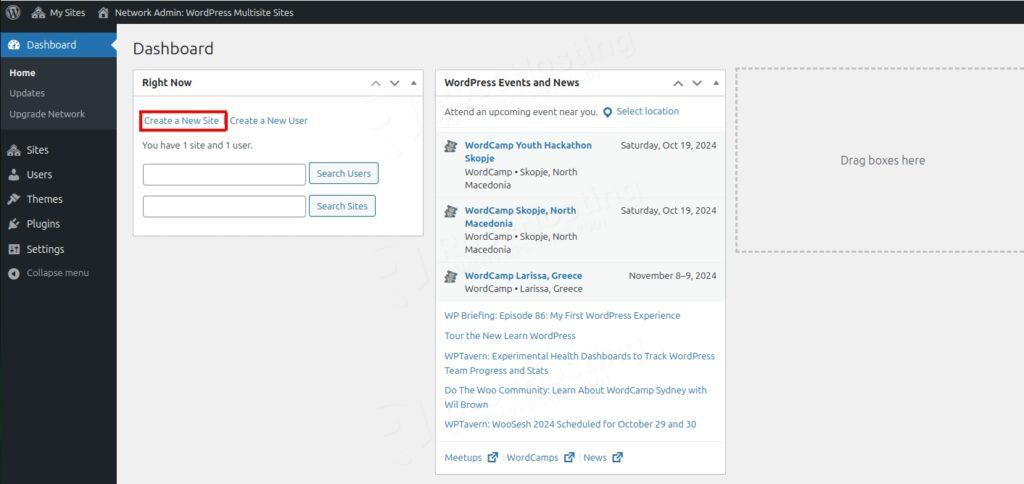
Now, navigate to My Sites —> Network Admin —> Click Dashboard as on the screenshot below:

Next, click on the Create a new Site button
Next, you will have to fill in the info about your second website:

That’s it. You successfully set up WordPress Multisite with OpenLiteSpeed on Ubuntu 24.04.
Of course, if you have difficulties and are not familiar with Linux, you don’t have to install WordPress multisite with OpenLiteSpeed server on Ubuntu 24.04. You can always contact our technical support. You only need to sign up for one of our monthly management plans and submit a support ticket. We are available 24/7 and will take care of your request immediately.
If you liked this post about setting up WordPress Multisite with OpenLiteSpeed on Ubuntu 24.04, please share it with your friends or leave a comment below.