In this guide we are going to provide you with step-by-step instructions on how to set up two-factor authentication on a WordPress website, hosted on CentOS 7 VPS. There are many two-factor authentication WordPress plugins available in the WordPress.org plugin repository, but for the purpose of this tutorial, we will install and set up the Google Authenticator plugin for WordPress.
Table of Contents
1. Update OS packages
Before starting with the installation procedure, update the server OS packages with the latest available packages by running the following commands:
sudo yum clean all
sudo yum update
2. Install PHP 7
CentOS 7 has PHP 5.4 installed by default. We can remove PHP 5.4 and install PHP 7.1 version. To do so, check which PHP 5.4 packages are installed on the server and remove them:
sudo rpm -qa | grep php
php-cli-5.4.16-42.el7.x86_64
php-pdo-5.4.16-42.el7.x86_64
php-common-5.4.16-42.el7.x86_64
php-5.4.16-42.el7.x86_64
sudo yum remove php php-cli php-common php-pdo
Then, install PHP 7.1 version:
sudo rpm -Uvh https://dl.iuscommunity.org/pub/ius/stable/CentOS/7/x86_64/ius-release-1.0-15.ius.centos7.noarch.rpm
sudo yum update
sudo yum install php71u php71u-devel php71u-gd php71u-pdo php71u-mysqlnd php71u-xml php71u-mcrypt php71u-intl php71u-mbstring php71u-json php71u-iconv php71u-opcache php71u-imap php71u-soap
3. Create a new database
mysql -u root -p
MariaDB [(none)]> CREATE DATABASE wordpress;
MariaDB [(none)]> GRANT ALL PRIVILEGES ON wordpress.* TO 'wordpress'@'localhost' IDENTIFIED BY 'Y0urPa55w0rd';
MariaDB [(none)]> flush privileges;
MariaDB [(none)]> quit;
4. Create a new virtual host in Apache:
vi /etc/httpd/conf.d/wordpress.conf
Add the following lines and save the file:
<VirtualHost *:80>
ServerName yourdomain.com
ServerAlias www.yourdomain.com
ServerAdmin webmaster@yourdomain.com
DocumentRoot /var/www/html/wordpress/

<Directory /var/www/html/wordpress>
Options Indexes FollowSymLinks MultiViews
AllowOverride All
</Directory>

ErrorLog /var/www/html/wordpress/logs/yourdomain.com_error.log
CustomLog /var/www/html/wordpress/logs/yourdomain.com_access.log combined

</VirtualHost>
5. Install WordPress
Download the latest version of WordPress, and extract it on the server:
cd /opt/
wget https://wordpress.org/latest.zip
unzip latest.zip
mv wordpress /var/www/html/wordpress/
Set proper permissions to the files and directories of WordPress:
sudo chown -R apache:apache /var/www/html/
Edit the PHP configuration file and add/modify the following settings (change the timezone according to your actual timezone):
memory_limit = 512M
date.timezone = US/Chicago
Restart the Apache service for the changes to take effect:
sudo systemctl restart httpd
Open http://yourdomain.com in your favorite web browser and follow the easy instructions to finish the WordPress installation.
6. Install Google Authenticator plugin
Log in to your WordPress dashboard and install the Google Authenticator plugin by clicking on the ‘Add New’ button from the Plugins menu, then activate it.
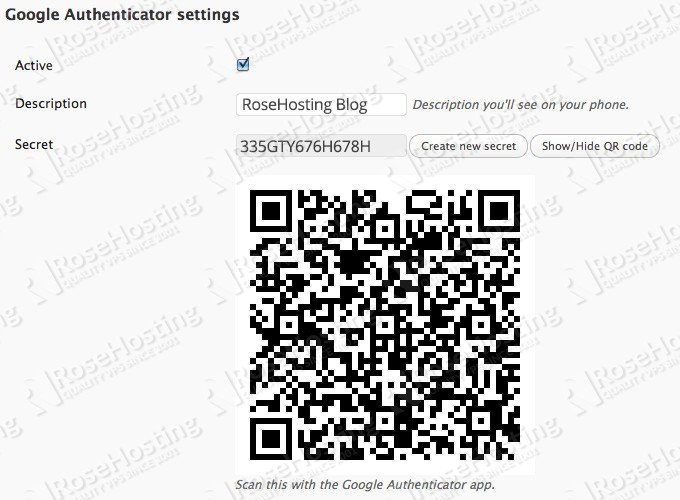
Go to Users -> your user (Admin) >> edit >> Google Authenticator Settings >> check ‘Active’ and ‘Relaxed mode’ >> Create new secret , write down the secret on a piece of paper and store it in a safe place. Then, click on the ‘Show QR code’ button next to the ‘Create new secret’ button and scan the generated QR code with your phone.
Click on the ‘Update profile’ button at the bottom of the page for the changes to take effect.
7. Verify if the WordPress Two-Factor Authenticator is working
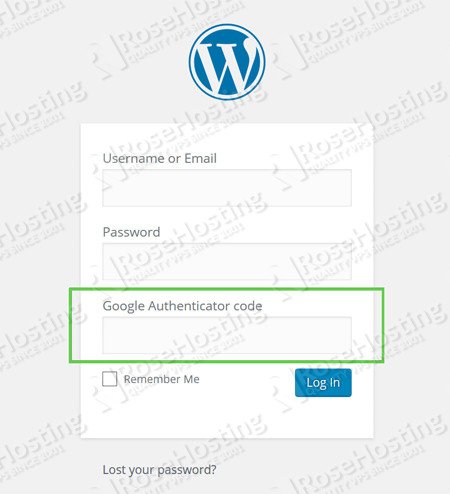
To test if the two-step authentication is set properly, log out from the WordPress back-end, open http://yourdomain.com/wp-admin and enter your username, password and Google Authenticator code.
That’s it, your WordPress website is now using a two-factor authentication and it is a little more secure now.

PS. If you liked this post on how to set up WordPress Two-Factor Authenticator please share it with your friends on the social networks using the buttons on the left or simply leave a reply below. Thanks.


